
Are you struggling with slow performance or glitches after updating your graphics card? Old GPU drivers might be the hidden cause.
Removing outdated drivers can clear up space, fix conflicts, and boost your system’s speed. But how do you uninstall them safely without causing new problems? You’ll discover simple, step-by-step methods to completely remove old GPU drivers from your computer. By following these tips, you’ll ensure your graphics run smoothly and your games or design work look their best.
Keep reading to take control of your system and say goodbye to driver troubles for good.
Prepare For Driver Removal
Preparing to uninstall old GPU drivers is an important step. It helps avoid problems during and after the removal process. Taking a few simple precautions ensures a smooth experience. Follow these key steps before you start uninstalling.
Backup Important Data
Save any important files on your computer first. This protects your data in case something goes wrong. Copy documents, photos, and other essential files to an external drive or cloud storage. It’s better to be safe than sorry.
Download Latest Gpu Drivers
Get the newest drivers for your graphics card before removing the old ones. Visit the official GPU manufacturer’s website to find the correct version. Having the latest drivers ready speeds up the update process.
Create A System Restore Point
Set a system restore point on your computer. This allows you to undo changes if the driver removal causes issues. Restore points save your system’s current state. Use the built-in Windows tool to create one quickly.

Credit: www.wikihow.com
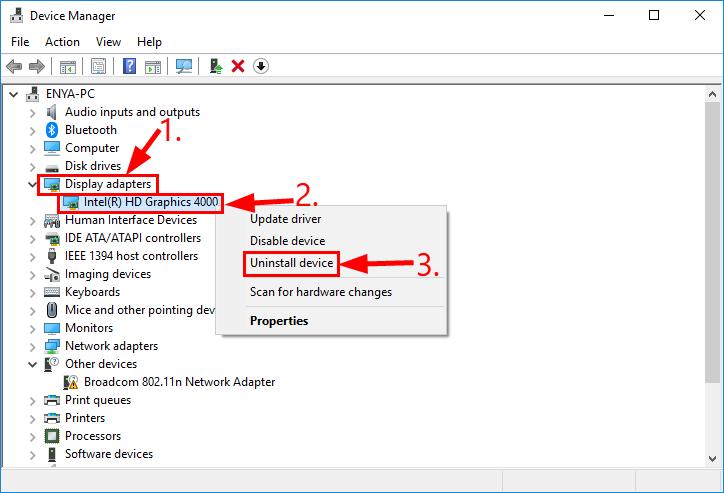
Use Device Manager To Uninstall
Using Device Manager to uninstall old GPU drivers is a simple and safe method. It helps remove outdated or faulty drivers that can cause display issues. This process clears the way for fresh, updated drivers to install properly.
The steps are easy to follow and require no extra software. Just a few clicks in Device Manager will uninstall the GPU driver cleanly. Below is a step-by-step guide to do this efficiently.
Access Device Manager
First, open Device Manager. Press the Windows key + R to open the Run box.
Type devmgmt.msc and press Enter. This opens the Device Manager window.
You can also right-click the Start button and select Device Manager from the menu.
Locate Display Adapters
In Device Manager, find the category called Display adapters. Click the arrow next to it.
This expands the list to show your GPU or graphics card. It may have the brand name like NVIDIA, AMD, or Intel.
Uninstall The Gpu Driver
Right-click your GPU device and select Uninstall device.
A confirmation box will appear. Check the option that says Delete the driver software for this device.
Click Uninstall to remove the old GPU driver completely from your system.
Employ Display Driver Uninstaller (ddu)
Employing Display Driver Uninstaller (DDU) is a reliable method to remove old GPU drivers completely. DDU clears all traces of previous drivers, avoiding conflicts with new installations. This ensures your system runs smoothly and your new GPU works without issues.
DDU works best in Safe Mode, where only essential system files run. This prevents any interference during the driver removal process. The tool is free, easy to use, and trusted by many tech experts.
Download And Install Ddu
First, visit the official website to download the latest version of DDU. Choose the correct file for your Windows version. After downloading, unzip the file to a folder you can easily access.
Run the setup file and follow the on-screen instructions to install DDU. The program does not need complex configurations. Keep the installation location simple for quick access later.
Boot Into Safe Mode
Restart your computer and enter Safe Mode. This mode disables unnecessary drivers and programs. To enter Safe Mode, press the appropriate key during startup (usually F8 or Shift + Restart).
Once in Safe Mode, your system will run with minimal drivers. This setting prevents driver conflicts during removal. It is a crucial step for a clean driver uninstall.
Run Ddu For Clean Removal
Open DDU from the installed location. Select your GPU type from the dropdown menu. Click “Clean and Restart” to begin the removal process.
DDU will delete all files related to the old GPU drivers. The tool will then restart your computer automatically. After reboot, your system will be free of old GPU drivers, ready for new ones.
Remove Leftover Files And Registry Entries
Removing leftover files and registry entries is essential after uninstalling old GPU drivers. These remnants can slow down your system or cause conflicts with new drivers. Clearing them helps keep your computer clean and running smoothly.
Some files and settings stay hidden in folders and the system registry. Manually deleting these ensures no old data interferes with your GPU performance. Follow the steps carefully to avoid accidental issues.
Delete Driver Folders Manually
Start by opening the File Explorer on your PC. Go to the main drive where Windows is installed, usually the C: drive. Look for folders named after your GPU brand, like NVIDIA or AMD.
Check these locations:
- C:Program Files
- C:Program Files (x86)
- C:ProgramData
- C:Users[Your Username]AppDataLocal
- C:Users[Your Username]AppDataRoaming
Delete any folders related to your old GPU driver. Empty the Recycle Bin afterward to free space. This step removes most leftover files.
Clean Registry Entries Safely
The Windows Registry stores settings for software and hardware. Old GPU drivers leave keys that may cause errors or slowdowns. Use the Registry Editor (regedit) to find and delete these entries.
Press Win + R, type “regedit,” and hit Enter. Before making changes, back up your registry by clicking File > Export. This backup protects your system if something goes wrong.
Search for your GPU brand name or driver name using Ctrl + F. Delete any keys related to the old driver carefully. Avoid deleting unrelated entries to prevent system issues.
Close the Registry Editor and restart your PC. Your system will run cleaner without leftover GPU driver data.
Install New Gpu Drivers
After removing old GPU drivers, installing new ones is the next step. This process improves your graphics card’s performance and fixes bugs. Using the latest drivers ensures your system runs smoothly and supports new games or software.
Run The Latest Driver Installer
Download the newest driver from your GPU maker’s official website. Open the file to start the installer. This file contains all the updates your graphics card needs.
Follow Installation Prompts
The installer will guide you through each step. Choose the recommended settings for best results. It may ask to close other programs. Follow these instructions carefully to avoid errors.
Restart Your System
After installation, restart your computer. This step lets the new drivers load properly. It also finalizes any changes made during setup. Your GPU is now ready to use with the latest drivers.

Credit: vixencomposites.com
Verify Driver Installation
After uninstalling old GPU drivers and installing new ones, verifying the driver installation is essential. This step ensures your system recognizes the new drivers correctly. It also helps avoid issues like crashes or poor performance.
Verification involves checking the device status and testing the GPU’s actual performance. Both steps are simple and quick but very effective.
Check Device Manager Status
Open Device Manager by typing “Device Manager” in the Windows search bar. Look for “Display adapters” and expand the list. Your GPU should appear without any warning icons. A yellow triangle or red cross means there is a problem with the driver.
Right-click your GPU and select “Properties.” Under the “Driver” tab, confirm the driver version and date. This information helps ensure the latest driver is installed properly.
Test Gpu Performance
Run a GPU benchmark or a graphic-intensive game to test performance. Monitor for smooth graphics and no crashes or glitches. You can also use software like GPU-Z to check GPU load and temperature.
If your GPU runs without errors and performs well, the driver installation is successful. This step confirms that your system uses the new driver correctly.
Troubleshoot Common Issues
Troubleshooting common issues helps ensure a smooth GPU driver removal. Problems may appear during uninstallation or new driver installation. Identifying issues fast saves time and prevents system errors. This section covers key problems and how to fix them easily.
Fix Driver Conflicts
Driver conflicts happen when old and new drivers clash. This can cause crashes or poor performance. To fix conflicts, uninstall all GPU drivers first. Use a tool like Display Driver Uninstaller for a clean removal. Restart your computer before installing new drivers. Check Device Manager to confirm no leftover drivers remain. Clean systems reduce conflict risk and boost stability.
Resolve Installation Errors
Installation errors may block new driver setup. Common causes include missing files or permission issues. Run the installer as an administrator to avoid permission problems. Turn off antivirus temporarily during installation. Corrupt downloads also cause errors. Download drivers directly from the official GPU website. Clear old driver files and restart the PC before retrying. These steps help complete the installation without errors.
Credit: www.esseg.eu
Frequently Asked Questions
How Do I Uninstall Old Gpu Drivers Safely?
To uninstall old GPU drivers safely, use Device Manager or Display Driver Uninstaller (DDU). Always back up data and create a restore point before starting. This prevents system issues and ensures a clean removal of outdated drivers.
Why Should I Remove Old Gpu Drivers First?
Removing old GPU drivers prevents conflicts and improves system performance. It ensures the new driver installs correctly and avoids errors caused by leftover files. Clean uninstallation maintains system stability and enhances graphics card functionality.
Can I Uninstall Gpu Drivers Without Affecting Performance?
Yes, uninstalling old GPU drivers before installing new ones improves performance. Removing outdated drivers eliminates conflicts and corrupted files. This step helps your GPU work optimally with the latest software updates.
What Tools Help Uninstall Old Gpu Drivers Effectively?
Display Driver Uninstaller (DDU) is a popular tool for removing GPU drivers completely. It cleans leftover files and registry entries. Device Manager is another built-in Windows option for uninstalling drivers safely.
Conclusion
Uninstalling old GPU drivers keeps your system clean and fast. It helps avoid errors and conflicts with new updates. Follow each step carefully for the best results. Restart your computer after uninstalling to finish the process. This simple task improves your computer’s performance and stability.
Stay updated by installing the latest drivers afterward. You’ll enjoy smoother graphics and better overall experience. Keep your device running well by removing outdated drivers regularly. A clean driver setup means fewer problems and better gaming or work sessions. Simple but effective!