
Are you struggling to get your GPU up and running? Knowing how to turn on your GPU can make a huge difference in your computer’s speed and graphics performance.
Whether you want smoother gaming, faster video editing, or better overall power, activating your GPU is the key. In this guide, you’ll discover simple steps to switch on your GPU and unlock its full potential. Keep reading, and by the end, you’ll have the confidence to boost your system’s performance like a pro.
Why Enable Your Gpu
Enabling your GPU can greatly improve your computer’s performance. The GPU helps handle graphics and complex tasks faster than the CPU alone. Many users do not realize the full potential of their system without activating the GPU. Turning on the GPU can make your device more efficient and capable.
Benefits Of Using A Gpu
The GPU speeds up visual tasks like video playback and image editing. It reduces the load on the CPU, allowing smoother multitasking. Many software programs run better with GPU support. This leads to less lag and faster processing times. The GPU also improves battery life by handling tasks more efficiently. It helps provide better graphics quality in games and applications. Overall, the GPU enhances your computer’s speed and responsiveness.
Common Scenarios For Gpu Activation
Users often enable the GPU for gaming to get better frame rates. Video editors benefit from faster rendering and smoother previews. People who use 3D modeling or CAD software also need GPU power. Machine learning and AI tasks run faster with GPU support. Even watching high-definition videos is smoother with an active GPU. Many modern applications detect and use the GPU automatically. Activating the GPU in these cases makes tasks easier and quicker.

Credit: nvidia.custhelp.com
Check Gpu Compatibility
Checking GPU compatibility is the first step to turn on your GPU. It helps you avoid problems and ensures smooth performance. Knowing if your system supports the GPU is key. This process includes identifying your GPU model and verifying system requirements.
Identify Your Gpu Model
Find out which GPU is inside your computer. On Windows, open Device Manager and look under Display Adapters. On Mac, click the Apple menu, then About This Mac, and check Graphics. This tells you the exact GPU model you have.
Knowing your GPU model helps you understand its features and limits. It also guides you in finding the right drivers and updates.
Verify System Requirements
Check your computer’s system requirements for the GPU. Look at the GPU’s official website or user manual for needed specs. Confirm your CPU, RAM, and power supply meet these needs.
Make sure your operating system supports the GPU. Also, check your motherboard has the right slot for the GPU. Ensuring these details helps your GPU work correctly without issues.
Access Bios Settings
Accessing the BIOS settings is the first step to turn on your GPU. BIOS controls many hardware features on your computer. You need to enter BIOS to change GPU settings. This process varies by system brand and model. Knowing how to enter BIOS helps you find the right options fast.
Entering Bios On Different Systems
To enter BIOS, restart your computer. Press a specific key during startup. Common keys include F2, Del, Esc, or F10. Some brands use unique keys, like F12 or F1. Watch the screen for instructions. It often says “Press [key] to enter setup.”
If you miss the key, restart and try again. On laptops, keys may differ from desktops. Check your user manual or brand website for exact keys.
Locate Gpu Configuration Options
Inside BIOS, use arrow keys to navigate menus. Look for sections like “Advanced,” “Chipset,” or “Peripherals.” GPU settings may be under these categories. Find options named “Integrated Graphics,” “Primary Display,” or “Video Configuration.”
Change the setting to enable the GPU you want. For example, set the primary display to “PCIe” for a dedicated GPU. Save your changes before exiting BIOS. Your GPU will be active after reboot.

Credit: www.youtube.com
Enable Gpu In Bios
Enabling the GPU in BIOS is a key step to improve your computer’s graphics performance. BIOS controls the hardware settings, including the graphics options. By enabling the dedicated GPU, you allow your system to use a more powerful graphics processor instead of the basic integrated one. This change helps with tasks like gaming, video editing, and running graphics-heavy applications.
Switching From Integrated To Dedicated Gpu
Start by restarting your computer. Press the BIOS key shown on the screen, usually Delete, F2, or Esc. Inside BIOS, find the graphics settings. This option might be under “Advanced,” “Chipset,” or “Video Configuration.” Change the setting from Integrated Graphics or IGD to PCI-E or Dedicated GPU. This switch lets the system use your better graphics card for all tasks.
Save And Exit Bios
After selecting the dedicated GPU, save your changes. Look for the “Save and Exit” option, usually found in the Exit tab or by pressing F10. Confirm the save to apply your new settings. Your computer will restart, and the dedicated GPU will be active. Check your system settings after boot to ensure the GPU is working correctly.
Update Gpu Drivers
Updating GPU drivers is a key step to turn on and optimize your graphics card. The right drivers make sure your GPU works well with your computer system. Outdated drivers can cause slow performance and errors.
Keep your GPU running smoothly by updating its drivers regularly. This process helps fix bugs and adds new features to your graphics card.
Download Latest Drivers
First, identify your GPU model. Visit the official website of your GPU brand, like NVIDIA, AMD, or Intel. Find the driver download section. Select your GPU model and operating system. Download the latest driver version available. Save the file to an easy-to-find location on your computer.
Install And Configure Drivers
Open the downloaded driver file. Follow the on-screen instructions carefully. Choose the installation type, usually “Express” or “Custom.” Express is faster and recommended for most users. Custom allows you to select specific features. After installation, restart your computer. This ensures the new drivers work properly. Adjust GPU settings using the control panel to match your needs.
Configure Gpu In Operating System
Configuring the GPU in your operating system ensures your computer uses the graphics card correctly. This setup improves performance for games, videos, and apps. Each OS has specific steps to enable and manage the GPU. Follow these simple guides to configure your GPU easily.
Windows Settings For Gpu
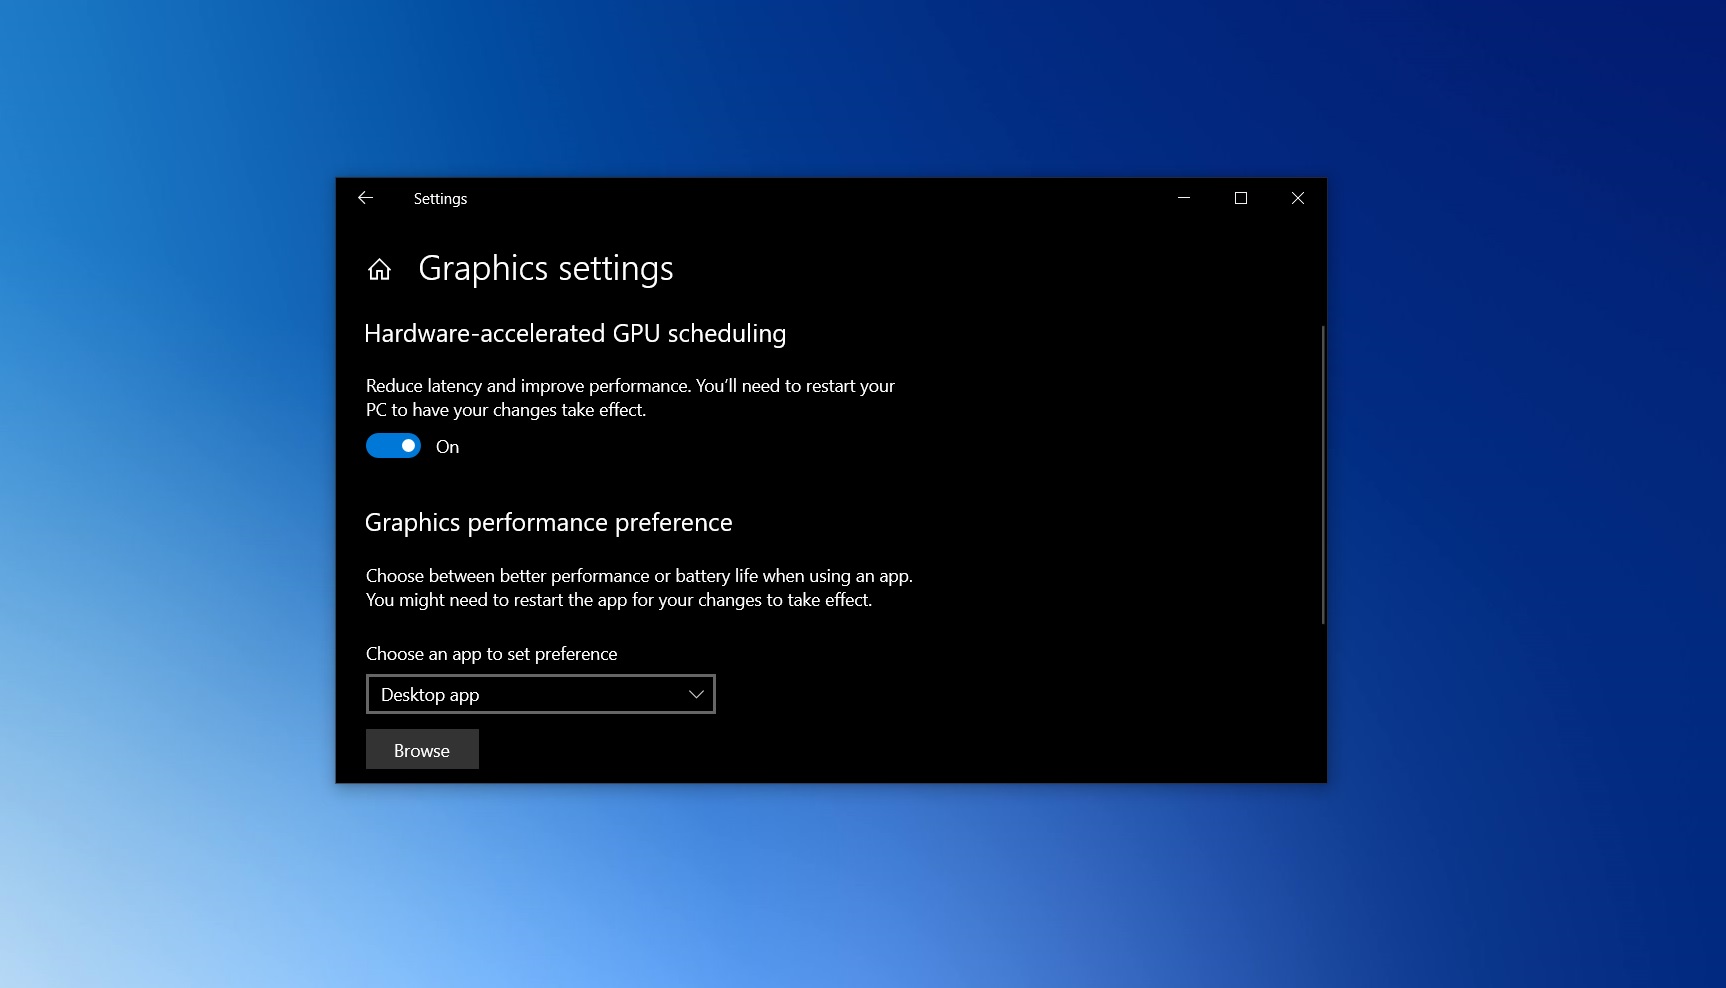
Open the Start menu and go to Settings. Click on System and then select Display. Scroll down and click on Graphics settings. Here, you can choose an app to set GPU preference. Select the app, then click Options. Choose High performance to use the dedicated GPU. Save your changes. This helps apps use the better graphics card automatically.
For more control, open the NVIDIA or AMD control panel. These programs let you adjust GPU settings for each app. You can also update your GPU drivers from Device Manager under Display adapters. Updated drivers improve GPU performance and fix bugs.
Mac And Linux Gpu Settings
Mac users can check GPU use in Activity Monitor under the GPU history tab. Mac automatically manages GPU switching between integrated and dedicated cards. To force the dedicated GPU, open System Preferences, then Battery or Energy Saver. Uncheck “Automatic graphics switching.” This forces the Mac to use the more powerful GPU.
Linux users can use terminal commands to check and set GPU use. The command lspci | grep VGA lists GPUs installed. Tools like PRIME or Bumblebee manage switching between GPUs on Linux. Installing proprietary drivers for NVIDIA or AMD improves performance. You can enable the GPU with commands specific to your Linux distro.
Optimize Gpu Performance
Optimizing your GPU performance helps your computer run faster and smoother. It ensures the graphics card works at its best without wasting power or causing heat. Simple steps can improve your GPU’s speed and efficiency. Let’s explore how to get the most from your GPU.
Adjust Power Settings
Changing power settings boosts GPU output. Set your computer to high performance mode. This prevents the GPU from slowing down to save energy. In Windows, open Power Options and select “High Performance.” On laptops, plug in the charger to avoid power-saving limits. This change helps the GPU run at full speed during tasks like gaming or video editing.
Use Performance-boosting Software
Special software can improve GPU performance. Graphics card brands often provide tools for tuning settings. These tools let you update drivers and adjust clock speeds safely. Some apps monitor temperature and usage, helping avoid overheating. Using this software keeps your GPU stable and efficient. Regular updates through these apps also fix bugs and improve speed.
Credit: www.windowslatest.com
Troubleshooting Gpu Issues
Troubleshooting GPU issues can be frustrating. Many users face problems turning on or using their GPU properly. Understanding common problems and knowing when to get help can save time and stress.
Some GPU issues are simple to fix at home. Others may need expert attention. This section guides you through common fixes and signs to seek professional help.
Common Problems And Fixes
One common problem is the GPU not detected by the system. Check if the card is properly seated in the slot. Re-seat the GPU by removing and reinserting it carefully.
Another issue is outdated or missing drivers. Download the latest drivers from the GPU manufacturer’s website. Install them and restart your computer.
Overheating can cause shutdowns or poor performance. Clean dust from the GPU fans and case. Ensure good airflow inside the computer case.
Screen flickering or artifacts often signal hardware or driver problems. Test the GPU in another computer if possible. Update or reinstall the graphics driver.
When To Seek Professional Help
If the GPU still does not turn on after basic fixes, consider professional help. Hardware failures need expert diagnosis and repair.
Power supply issues affecting the GPU require specialized tools. Professionals can test and replace faulty components safely.
Complex BIOS or motherboard problems may also affect GPU function. A technician can adjust BIOS settings or replace hardware parts.
Do not open the GPU yourself if under warranty. Seek authorized service centers to avoid voiding warranty coverage.
Frequently Asked Questions
How Do I Enable Gpu On Windows 10?
To enable GPU on Windows 10, go to Settings > System > Display > Graphics settings. Select your app and set it to use the high-performance GPU. This allows specific programs to utilize your dedicated graphics card for better performance.
Can I Turn On Gpu From Bios Settings?
Yes, you can enable GPU from BIOS by accessing your computer’s startup menu. Look for settings related to integrated or dedicated graphics and enable your GPU. Save changes and restart your system for the GPU to activate.
How To Check If Gpu Is Turned On?
Open Task Manager and go to the Performance tab. Select GPU to view its usage and status. If you see activity, your GPU is turned on and functioning properly.
Why Is My Gpu Not Turning On Automatically?
Your GPU might not activate due to driver issues or power settings. Ensure your GPU drivers are updated and check power management settings. Also, verify that your system prioritizes the dedicated GPU over integrated graphics.
Conclusion
Turning on your GPU can boost your computer’s speed and graphics. Follow the simple steps to enable it correctly. Check your device settings and drivers first. Always restart your computer after changes. Keep your GPU updated for best results. This helps your system run smoother and faster.
Now, enjoy better graphics and performance easily.