
Are you noticing your laptop struggling with games or heavy graphics tasks? It might be time to replace your GPU.
Upgrading your laptop’s graphics card can breathe new life into your device, making everything run smoother and look better. But how do you do it without breaking your laptop or your budget? In this guide, you’ll find clear, step-by-step instructions to help you replace your GPU safely and effectively.
Keep reading, and you’ll learn exactly what to do to get your laptop performing like new again.
Prepare Your Workspace
Preparing your workspace is the first step in replacing a GPU on your laptop. A clean and organized area makes the process easier and safer. It helps avoid losing small parts or damaging components. Setting up properly reduces stress and speeds up the job.
Gather Necessary Tools
Collect all tools before you start. You will need a small screwdriver set, usually Phillips and flathead. A plastic spudger or pry tool helps open the laptop without damage. Tweezers are useful for handling tiny screws and connectors. Have a clean cloth to place screws and parts on. Keep everything close to avoid unnecessary movement.
Ensure Static-free Environment
Static electricity can harm laptop parts. Work on a non-carpeted floor or use an anti-static mat. Ground yourself by touching a metal object or wear an anti-static wristband. Avoid wearing clothes that generate static, like wool or synthetic fabrics. Keep your workspace dry and free of dust. This protects delicate electronics during the GPU replacement.
Check Laptop Compatibility
Start by checking if your laptop supports a new GPU. Look at the model and hardware limits before buying. This step saves time and avoids damage.
Identify Your Current Gpu
Start by knowing the exact GPU inside your laptop. This helps to find the right replacement. Check the system settings or use a tool like Device Manager. Write down the GPU model and specifications. This information is crucial before making any changes.
Research Compatible Upgrades
Not all GPUs fit every laptop. Laptops often have built-in or soldered graphics cards. Look up your laptop model to see which GPUs it supports. Check forums, manufacturer websites, or user guides. Compatibility depends on the laptop’s motherboard and cooling system. Choose a GPU that matches your laptop’s design and power limits.
Backup Important Data
Backing up your important data is the first step before replacing your laptop’s GPU. This step protects your files from accidental loss. Laptop repairs can sometimes cause data loss. Creating a backup gives you peace of mind.
Save all your important documents, photos, and videos. Also, back up any work files or software settings you need. A good backup means your data stays safe no matter what happens during the GPU replacement.
Choose A Backup Method
Select a backup method that fits your needs. Use an external hard drive, USB stick, or cloud storage. External drives store data offline and can hold large files. Cloud storage offers easy access from anywhere with internet. Pick the one you find easiest to use.
Create A Full Backup
Make a complete backup of your laptop’s data. Don’t skip system files or hidden folders. Use backup software or copy files manually. Check that all important files are saved correctly. This helps restore your data fully if needed.
Verify Backup Integrity
After backing up, verify the files are intact. Open some files to check they work properly. Ensure the backup device or cloud account has enough free space. This reduces the risk of corrupted or missing files later.
Keep Backup Secure
Store your backup in a safe place. Avoid locations prone to damage or theft. Label the backup device clearly to avoid confusion. A secure backup protects your data from loss or damage.
Power Down And Unplug
Before starting to replace the GPU on your laptop, powering down and unplugging is crucial. This step ensures your safety and protects your device from electrical damage. Never skip this part. A fully powered-off laptop with no power source connected is the safest to work on.
Even if your laptop is off, residual power can remain inside the system. Unplugging removes all power sources and helps avoid shorts or shocks. Take your time to do this carefully. It sets the foundation for a smooth GPU replacement process.
Remove Battery If Possible
Many laptops have removable batteries. Removing the battery cuts off power completely. Find the battery latch or screws on the laptop bottom.
Slide the latch or unscrew to free the battery. Gently lift it out. Keep the battery away from metal objects to avoid damage.
If your laptop does not have a removable battery, just ensure it is fully powered off and unplugged. This step adds an extra layer of safety during GPU replacement.
Open Laptop Case
Opening the laptop case is the first step to replace your GPU. It gives you access to the internal parts safely. Take your time and follow each step carefully. This part does not need force or rushing.
Prepare a clean workspace. Use a soft cloth to protect your laptop from scratches. Gather the right tools, usually a small screwdriver set. Keep screws organized to avoid losing them.
Locate Gpu Compartment
Turn your laptop upside down. Look for a panel that covers the GPU area. This panel is often smaller than the main bottom cover. Check your laptop manual for exact location. The GPU compartment may have a small icon or label.
Some laptops do not have a separate GPU compartment. In that case, you will open the entire back cover. Be gentle while identifying the GPU location. It usually sits near the cooling fan and heat pipes.
Remove Screws And Panels
Use the correct screwdriver to remove screws from the panel. Keep screws in a safe place. Unscrew all visible screws but do not force any. Some screws may be hidden under stickers or rubber feet.
After removing screws, gently lift the panel off. Use a plastic tool if needed to pry the cover carefully. Avoid using metal tools that can damage the laptop. Place the panel aside safely.
With the panel removed, you can now access the GPU. Be cautious not to touch other components. Static electricity can damage sensitive parts. Use an anti-static wrist strap if possible.

Credit: www.reddit.com
Disconnect Old Gpu
Disconnecting the old GPU is a key step in replacing your laptop’s graphics card. It requires care to avoid damage to the delicate parts inside.
Start by making sure the laptop is completely powered off and unplugged from any power source. This helps keep you safe and protects the hardware.
Unplug Cables
Look for any cables connected to the GPU. These might include power cables or display connectors.
Gently pull each cable out by holding the connector, not the wire. This prevents damage to the cables.
Take your time and check all sides of the GPU for hidden connections.
Release Gpu Locking Mechanism
Most laptop GPUs have a locking mechanism to hold them firmly in place.
Find the small latch or screw that secures the GPU. This can vary by laptop model.
Use the correct tool to carefully unlock or unscrew it. Do not force it, or you may break the parts.
Once unlocked, the GPU should lift out easily with a gentle pull.
Install New Gpu
Installing the new GPU is a key step in upgrading your laptop’s graphics. This process requires careful handling to avoid damage. Follow the steps below to place the GPU correctly and secure it for optimal performance.
Align And Insert Gpu
Hold the new GPU by its edges. Avoid touching the gold connectors or chips. Locate the GPU slot on the laptop’s motherboard. Match the GPU’s connector with the slot carefully. Align the GPU at a slight angle. Gently press the GPU into the slot until it fits snugly. Do not force it. Proper alignment ensures good connection and prevents damage.
Secure Gpu In Place
After inserting, check for mounting points or screws. Use the screws removed earlier to fix the GPU in place. Tighten screws firmly but avoid overtightening. Some laptops use clips instead of screws. Make sure clips snap securely around the GPU. A stable GPU prevents movement and connection issues. Double-check the GPU is firmly seated before closing the laptop.
Credit: www.shoshitamam.com
Reassemble Laptop
Reassembling your laptop is the final step after replacing the GPU. It ensures your device works properly and stays protected. Take your time to put everything back carefully. Avoid rushing to prevent damage or missing parts.
Replace Panels And Screws
Start by placing the laptop panels back in their original positions. Align each panel carefully to fit perfectly. Use the correct screws for each panel. Tighten screws gently to avoid stripping them. Check that all panels sit flush with the laptop body. This step protects internal parts from dust and damage.
Reinstall Battery
Next, reconnect the battery to the laptop. Slide it into place or connect the battery cable. Ensure the battery fits securely and locks if it has a latch. A loose battery can cause power issues. After reinstalling, do a quick power test to confirm the laptop turns on.
Update Drivers And Bios
After replacing your laptop’s GPU, updating the drivers and BIOS is essential. This step ensures your new hardware works correctly. It helps avoid errors and improves performance. Follow the steps below to update safely and easily.
Download Latest Gpu Drivers
Start by finding the newest drivers for your GPU. Visit the official website of your GPU manufacturer. Enter your GPU model and download the correct driver version. Always choose drivers that match your laptop’s operating system. After downloading, run the installer and follow the instructions. Restart your laptop to complete the update. Updated drivers fix bugs and improve compatibility.
Check For Bios Updates
Next, check if your laptop’s BIOS needs an update. BIOS controls hardware settings and system startup. Visit your laptop manufacturer’s support page. Search using your laptop model number to find BIOS updates. Download the latest BIOS file and read the instructions carefully. Use the official tool to install the update. Updating BIOS can fix hardware issues and support new GPU features.
Test New Gpu Performance
Testing your new GPU’s performance is a key step after installation. It confirms the upgrade works well and meets your needs. This step helps identify any issues early on. You will see how the GPU handles real tasks. Follow the steps below to check your GPU’s power and stability.
Run Benchmark Tests
Benchmark tests measure your GPU’s speed and strength. Use trusted software like 3DMark or Unigine Heaven. These tools create intense graphics scenes to push the GPU. Watch the scores and compare them to your old GPU. Higher scores mean better performance. Run multiple tests to get consistent results.
Check For Overheating
Overheating can damage your GPU and reduce speed. Use monitoring tools like HWMonitor or MSI Afterburner. These apps show real-time temperature data. Play games or run benchmarks while watching the temperatures. Keep the GPU below 85°C for safety. If it gets too hot, improve cooling or adjust fan settings.
Troubleshoot Common Issues
Replacing a GPU on a laptop can lead to common issues. These problems may affect your display or software. Troubleshooting helps to fix these issues quickly. A smooth GPU replacement needs a clear understanding of these problems. This section covers basic solutions for the most common troubles.
Fix Display Problems
After replacing the GPU, the screen may stay black or flicker. Check the GPU seating inside the laptop. Make sure it fits tightly and correctly. Inspect the display cable for damage or loose connection. Try connecting an external monitor to test the video output. If the external display works, the laptop screen may be faulty. Reset the laptop by removing the battery and power for a few minutes. This can clear hardware glitches. Update the BIOS to ensure compatibility with the new GPU.
Resolve Driver Conflicts
Driver conflicts cause crashes or poor GPU performance. Remove old GPU drivers completely using a driver cleaner tool. Download the latest drivers from the GPU manufacturer’s website. Install the correct drivers for your laptop model and GPU. Avoid installing drivers from third-party sites. Restart the laptop after driver installation. Use Device Manager to check for any driver errors. Disable integrated graphics in BIOS if the system uses both GPUs. This stops driver conflicts and improves performance.

Credit: www.youtube.com
Frequently Asked Questions
Can I Replace A Laptop Gpu Myself?
Yes, you can replace a laptop GPU if it is removable. Most laptops have integrated or soldered GPUs, making replacement difficult. Check your laptop’s manual or manufacturer website to confirm if the GPU is replaceable before attempting.
What Tools Do I Need To Replace A Laptop Gpu?
You will need a precision screwdriver set, anti-static wrist strap, thermal paste, and a plastic pry tool. These tools help safely open the laptop and properly install the new GPU without damaging components.
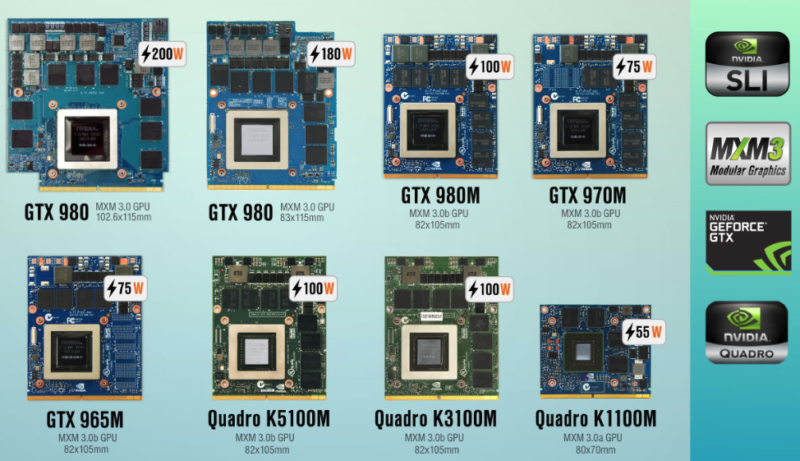
How Do I Know If My Laptop Gpu Is Replaceable?
Check your laptop’s service manual or manufacturer website for hardware upgrade options. Laptops with MXM modules usually allow GPU replacement, while most ultrabooks and budget models have soldered GPUs.
What Precautions Should I Take During Gpu Replacement?
Disconnect the battery and power source before starting. Use an anti-static wrist strap to avoid static damage. Work on a clean, flat surface and handle components gently to prevent hardware damage.
Conclusion
Replacing a laptop GPU can seem hard but is doable with care. Follow the steps slowly and check each part carefully. Use the right tools and keep your workspace clean. Take your time and avoid rushing to prevent damage. After replacing, test the laptop to see if it works well.
This upgrade can help your laptop run better and last longer. Remember, patience and attention make the process smooth and safe.