
Are you tired of your laptop struggling with games or heavy graphic tasks? Upgrading your GPU can give your machine a fresh boost without buying a new laptop.
But how exactly do you do it? You might think it’s impossible or too complicated, but it’s easier than you imagine. You’ll discover simple steps to upgrade your laptop’s GPU and enjoy smoother performance. Keep reading, and you’ll soon unlock the power your laptop has been missing.
Laptop Gpu Upgrade Basics
Upgrading a laptop GPU can improve graphics and overall performance. Many users want better visuals for gaming, video editing, or design work. Understanding the basics helps decide if a GPU upgrade is possible or needed.
This section explains key points about laptop GPUs and their types. It also highlights when to consider an upgrade and differences between integrated and dedicated GPUs.
When To Consider Upgrading
Think about upgrading the GPU if your laptop runs games or programs slowly. Lagging videos or poor graphics quality also signal a need for better hardware. If you use software needing strong graphics, upgrading may help. Note that not all laptops allow GPU upgrades.
Types Of Laptop Gpus
Laptops use two main types of GPUs: integrated and dedicated. Integrated GPUs share the laptop’s main memory and are less powerful. Dedicated GPUs have their own memory and provide higher graphics performance. The choice depends on your laptop model and needs.
Integrated Vs Dedicated Gpus
Integrated GPUs are built into the laptop’s processor. They save power but offer limited graphics power. Dedicated GPUs are separate cards installed inside the laptop. They handle demanding tasks better but use more power. Most gaming and professional laptops use dedicated GPUs.
Compatibility Check
Upgrading a laptop’s GPU is not always simple. Compatibility is the main factor to consider first. Not every laptop supports GPU upgrades. Checking compatibility saves time and avoids damage. This step ensures the new GPU fits and works well.
Identifying Your Laptop Model
Find your laptop model number. Check the label under the laptop or in system settings. This number helps you search for specific upgrade guides. Knowing the exact model reveals what parts fit your laptop.
Checking Gpu Slot Type
Look for the GPU slot on your laptop’s motherboard. Most laptops use soldered GPUs with no slot. Some gaming laptops have MXM slots for upgradeable GPUs. Confirm the slot type to see if a new GPU fits.
Bios And Firmware Requirements
Check your laptop’s BIOS version and firmware. New GPUs may need updated BIOS to work properly. Visit the laptop manufacturer’s website for updates and instructions. Installing the right BIOS avoids compatibility issues.
Choosing The Right Gpu
Choosing the right GPU for your laptop upgrade is very important. The new GPU must match your needs and your laptop’s limits. Picking the best GPU helps your laptop run better and last longer.
Performance Needs
Think about what you want to do with your laptop. For gaming, a GPU with high speed and good graphics is best. For video editing or 3D work, choose one with strong processing power. If you only use your laptop for simple tasks, a basic GPU may be enough.
Power And Cooling Constraints
Laptops have limited space for power and cooling. A powerful GPU uses more energy and creates more heat. Check your laptop’s power supply and cooling system before upgrading. Choose a GPU that fits these limits to avoid damage and overheating.
Budget Considerations
Set a clear budget for your GPU upgrade. High-end GPUs cost more but offer better performance. Mid-range GPUs give good value and balance speed with price. Find a GPU that works well and fits your budget to get the best results.
Credit: www.pcworld.com
Preparing For The Upgrade
Preparing for a GPU upgrade on your laptop is a crucial step. It ensures the process goes smoothly and safely. Taking time to get ready helps avoid problems. This section covers the key preparations you need before opening your laptop.
Gathering Tools And Materials
Start by collecting all necessary tools. A small screwdriver set is essential. You may also need thermal paste for better heat transfer. Have a clean cloth or anti-static brush ready. Keep your new GPU close to avoid delays. Having everything on hand saves time and stress.
Backing Up Important Data
Backing up your data protects it from loss. Save important files to an external drive or cloud. This step is vital if something goes wrong. Do not skip this part, even if you think it is safe. Better safe than sorry.
Creating A Static-free Workspace
Static electricity can damage your laptop’s components. Work on a hard surface, not carpet or fabric. Use an anti-static wristband if possible. Touch a metal object often to discharge static. Keep your workspace clean and organized. This prevents accidents and keeps your parts safe.
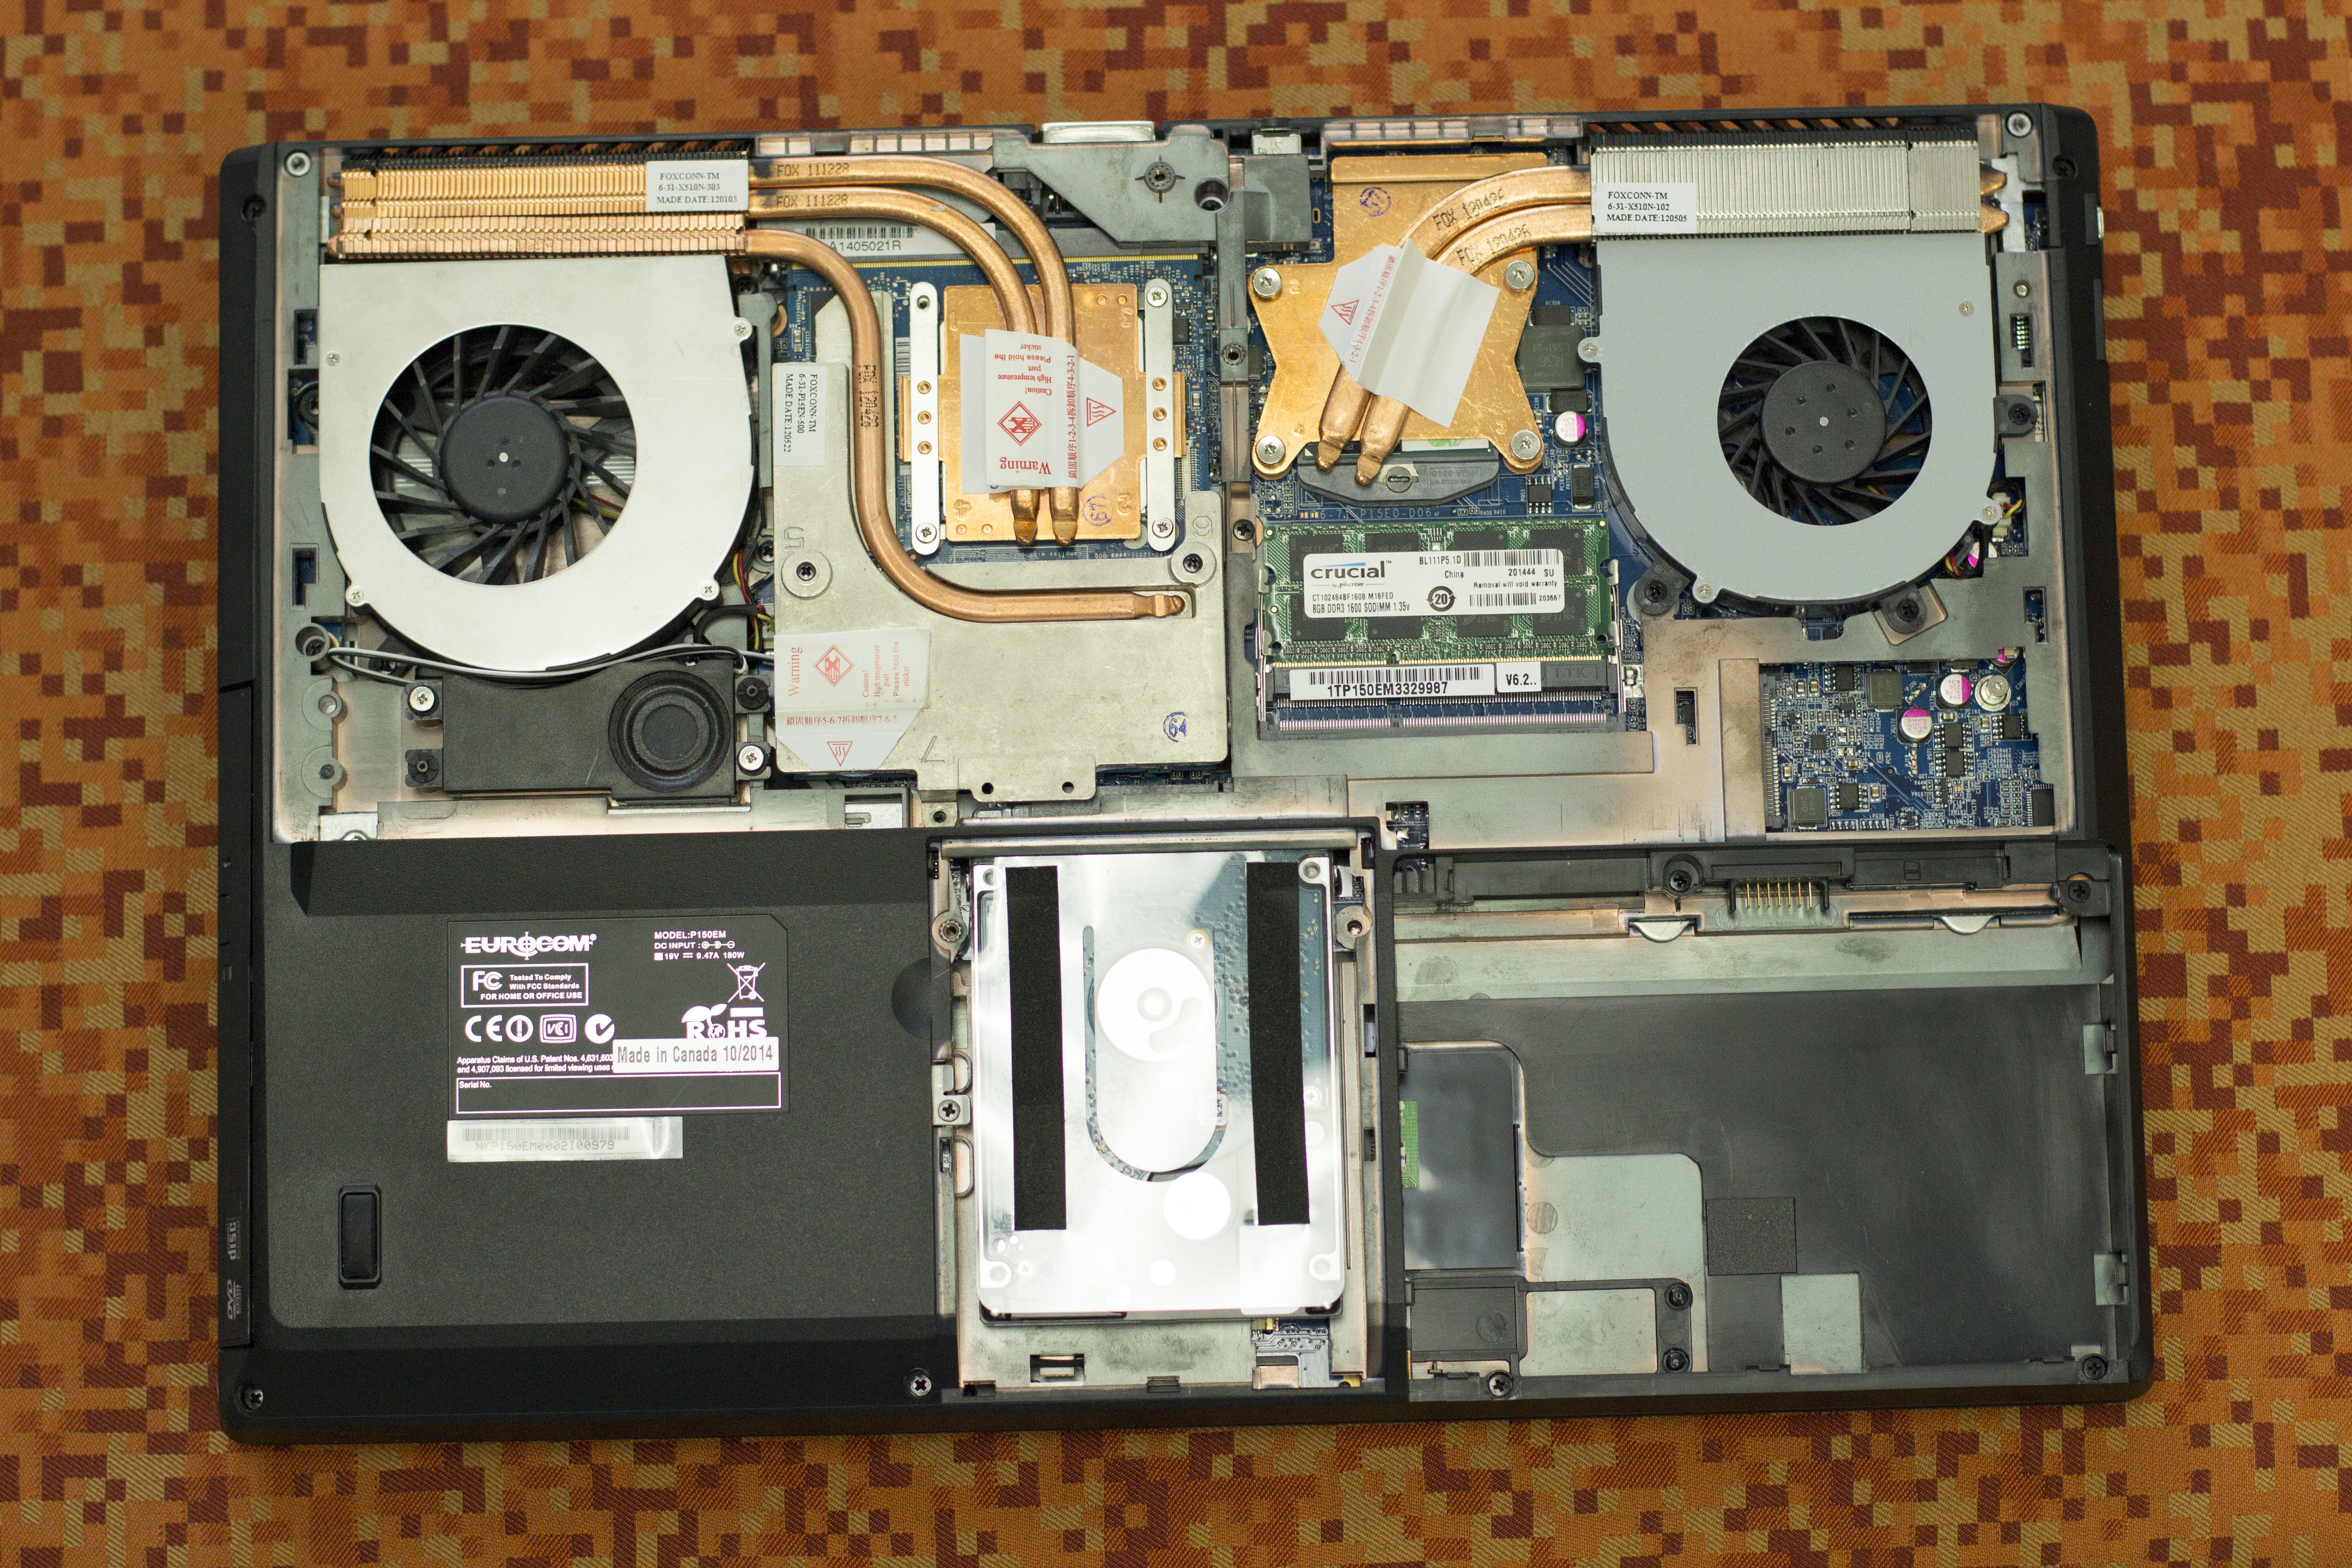
Disassembling The Laptop
Disassembling a laptop is the first step to upgrade the GPU. This process needs care and patience. Every laptop model is different, but the basics stay the same. You must open the laptop carefully to avoid damage. Knowing where the GPU is located helps during the upgrade. Protecting internal parts is very important. Follow the steps slowly and use the right tools.
Removing The Back Panel
Turn off the laptop and unplug all cables. Flip the laptop upside down on a clean surface. Use a small screwdriver to remove all screws from the back panel. Keep the screws in a safe place to avoid losing them. Gently lift the back panel starting from one corner. Use a plastic pry tool if needed to avoid scratches. Take your time to avoid breaking clips or connectors.
Locating The Gpu Module
Look inside the laptop for the GPU module. It is usually near the CPU or cooling fan. The GPU is a small chip or card with heat sinks or fans attached. Some laptops have the GPU soldered on the motherboard. Others have a removable GPU card. Check your laptop model’s manual or online guide for exact location. Identifying the GPU helps in removing and replacing it correctly.
Handling Internal Components Safely
Touch a metal part to discharge static electricity before handling parts. Use an anti-static wrist strap if you have one. Avoid touching the gold connectors or chips directly. Hold parts by the edges only. Do not force any part while removing or installing. Keep liquids and food away from the work area. Work in a clean, well-lit space to see all parts clearly. Handle each piece gently to prevent damage.

Credit: www.youtube.com
Removing The Old Gpu
Removing the old GPU from a laptop is a careful process. It needs patience and attention to detail. The GPU is a sensitive part, so you must handle it gently. Follow each step to avoid damage and prepare for the new GPU.
Disconnecting Power And Connectors
Start by turning off the laptop and unplugging it. Remove the battery if possible. This stops any power flow. Next, find the cables connected to the GPU. Carefully unplug these power cables and connectors. Use gentle pressure to avoid breaking any clips or wires.
Unscrewing And Detaching The Gpu
Look for screws that hold the GPU in place. Use the right screwdriver to remove them. Keep the screws safe for later use. Slowly lift the GPU from its slot. If it resists, check for hidden screws or clips. Do not force it out. Pull the GPU straight up to avoid bending pins.
Cleaning The Gpu Slot
After removing the GPU, clean the slot. Use a soft brush or compressed air. Remove dust and debris gently. This ensures a good connection for the new GPU. Avoid using liquids or sharp tools. Cleanliness helps the new GPU work better and last longer.
Installing The New Gpu
Installing the new GPU is a key step in upgrading your laptop. This process needs care and focus to avoid damage. Follow each part carefully for a smooth installation.
Aligning And Securing The Gpu
First, check the GPU slot on your laptop’s motherboard. Hold the new GPU gently and align it with the slot. Make sure the connectors match perfectly. Press the GPU down slowly until it fits firmly. Use screws or clips to secure the GPU in place. This keeps the card stable and prevents movement.
Reconnecting Power And Cables
Next, reconnect any power cables to the GPU. These cables supply the necessary electricity for the card. Ensure each cable is attached to the right port. Avoid forcing cables into the wrong slots. Secure cables neatly to avoid blocking fans or vents.
Applying Thermal Paste If Needed
Some GPUs need thermal paste for better heat transfer. Clean the old paste from the GPU and cooler with a soft cloth. Apply a small amount of new thermal paste to the GPU chip. Spread it evenly but thinly. This helps keep the GPU cool during use. Attach the cooler back carefully over the GPU.
Reassembling The Laptop
Reassembling the laptop is a key step after upgrading the GPU. It requires care and attention. Every part must fit well. This ensures the laptop works properly and stays safe. Take your time to avoid mistakes.
Replacing The Back Panel
Place the back panel carefully over the laptop base. Make sure it aligns with all edges and ports. Gently press the panel to snap it back into place. Avoid forcing it, as this can break clips or plastic parts.
Securing Screws Properly
Use the right screwdriver for your laptop screws. Tighten each screw firmly but not too tight. Over-tightening can strip the holes or damage the laptop case. Follow the original screw pattern to keep everything secure.
Double-checking Connections
Look inside before fully closing the laptop. Check all cables and connectors for a secure fit. Loose connections can cause the laptop to fail or the GPU to not work. Confirm every wire is in place and undamaged.
Post-upgrade Setup
After upgrading the GPU on your laptop, some important steps follow. These steps help your laptop use the new graphics card properly. You must install the right drivers, adjust display settings, and check the performance. This process ensures smooth and efficient operation.
Installing Gpu Drivers
First, install the correct drivers for your new GPU. Drivers allow the laptop to communicate with the graphics card. Visit the official website of the GPU manufacturer. Download the latest driver version that matches your operating system. Run the installer and follow the on-screen instructions. Restart your laptop after installation to apply changes.
Configuring Display Settings
Next, adjust the display settings for the best visuals. Open the display settings menu on your laptop. Set the screen resolution to the recommended level. Adjust refresh rate and color settings for better image quality. You may also choose how multiple displays work if connected. Save changes before closing the settings window.
Running Performance Tests
Finally, run performance tests to check the GPU’s functionality. Use benchmarking tools designed for graphics cards. These tests measure speed, temperature, and stability. Compare results with expected scores for your GPU model. If performance is low, revisit driver installation or settings. Testing confirms your upgrade works well.

Credit: www.reddit.com
Troubleshooting Tips
Upgrading a laptop GPU can improve your device’s performance. Yet, problems may arise during or after the upgrade. Troubleshooting helps fix these issues quickly. It keeps your laptop running smoothly and safely. Below are common tips to handle typical problems with GPU upgrades.
Common Installation Issues
Sometimes, the laptop may not recognize the new GPU. Check the connection carefully. Make sure the GPU fits well in its slot. Update the laptop’s BIOS and drivers. Restart the system after installing the new GPU. Errors during installation often relate to loose parts or outdated software.
Dealing With Overheating
Upgraded GPUs can produce more heat. Watch your laptop’s temperature closely. Use a cooling pad or external fan to reduce heat. Clean dust from vents and fans regularly. Avoid blocking airflow by placing the laptop on soft surfaces. Overheating may cause crashes or slow performance.
When To Seek Professional Help
Some problems need expert attention. If your laptop does not start after the upgrade, ask a technician. Strange noises or burning smells require immediate help. Professionals can safely handle hardware issues. Don’t risk damaging your laptop by trying complex repairs alone.
Frequently Asked Questions
Can I Upgrade The Gpu On Any Laptop Model?
Not all laptops support GPU upgrades. Most have integrated or soldered GPUs. Check your laptop’s manual or manufacturer website for upgrade options.
What Tools Are Needed To Upgrade A Laptop Gpu?
You typically need a small screwdriver set, thermal paste, and an anti-static wrist strap. Some laptops may require specialized tools for disassembly.
Will Upgrading My Laptop Gpu Improve Gaming Performance?
Yes, a better GPU can significantly boost gaming graphics and frame rates. However, ensure compatibility and adequate cooling before upgrading.
How Much Does It Cost To Upgrade A Laptop Gpu?
Costs vary widely based on GPU model and labor. Expect to spend between $150 to $500, including parts and professional installation.
Conclusion
Upgrading your laptop’s GPU can boost performance and extend its life. It takes patience and careful steps. Not all laptops support GPU upgrades, so check compatibility first. Choose the right GPU for your needs and budget. Follow safety tips to avoid damage.
With the right approach, your laptop can handle games and tasks better. Keep learning and stay patient during the process. Your effort can make a real difference in your laptop’s power. Simple upgrades can bring big improvements. Give your laptop a new chance to perform well.