
Are you ready to upgrade your PC with the powerful AM5 CPU but unsure where to start? Installing a new processor might seem tricky, but with the right steps, you can do it yourself quickly and safely.
This guide will walk you through each part of the process, making it simple and stress-free. By the end, you’ll have your AM5 CPU installed perfectly, ready to boost your system’s performance. Keep reading to discover the easy way to get your new CPU up and running!

Credit: www.youtube.com
Preparing Your Workspace
Preparing your workspace is the first step to install an AM5 CPU safely. A clean and organized area helps avoid mistakes. It also protects the delicate parts from damage. Setting up your workspace correctly saves time and effort during installation.
Gathering Necessary Tools
Collect all tools before starting the installation. You will need a screwdriver, thermal paste, and a clean cloth. Having these tools ready prevents interruptions. Use a screwdriver that fits the screws perfectly. Thermal paste ensures good heat transfer between the CPU and cooler. Keep everything within easy reach to work smoothly.
Ensuring Static-free Environment
Static electricity can damage the CPU and motherboard. Work on a non-carpeted surface to reduce static risk. Use an anti-static wrist strap to ground yourself. If you don’t have one, touch a metal object often. Avoid wearing clothes that create static, like wool or polyester. Keep electronic devices away from your workspace during installation.
Credit: www.youtube.com
Checking Compatibility
Checking compatibility is the first step before installing your AM5 CPU. This ensures the CPU and motherboard work well together. It helps avoid damage and performance issues. Taking time to verify compatibility saves effort later.
Matching Am5 Socket With Cpu
The AM5 socket is a new design for certain AMD CPUs. Your CPU must fit this socket to install correctly. Check the CPU model and motherboard specs. They should both list AM5 support. Using a different socket type will prevent installation and may harm parts.
Verifying Motherboard Bios Version
The motherboard BIOS controls hardware recognition and function. BIOS updates add support for new CPUs like AM5 models. Check your motherboard’s current BIOS version in its settings. Compare it with the version needed for your CPU. Update the BIOS if the version is too old. This step helps the system run smoothly and avoid startup problems.
Removing Old Cpu
Removing the old CPU is an important step before installing your new AM5 processor. It needs care and attention to avoid damage. Follow each step carefully to keep your computer safe and ready for the new CPU.
Powering Down And Unplugging
Turn off your computer completely. Do not just put it to sleep. Unplug the power cable from the wall outlet. Also, disconnect all other cables attached to the PC. This stops any chance of electric shock or damage.
Releasing Cpu Retention Mechanism
Open the computer case to find the CPU socket on the motherboard. Locate the retention arm next to the CPU socket. Gently push it down and away to release the lock. Lift the arm fully up and away from the socket.
Safely Lifting Out Old Cpu
Hold the CPU by its edges only. Avoid touching the pins or contacts underneath. Slowly lift the CPU straight up from the socket. Place it on an anti-static surface or container. Keep it safe for future use or disposal.
Installing Am5 Cpu
Installing an AM5 CPU needs care and attention. This process ensures the CPU fits well and works properly. Follow each step to avoid damage and get the best performance from your system.
Handle the CPU gently. Keep the workspace clean and static-free for safety. Use a soft touch to protect the delicate pins and contacts.
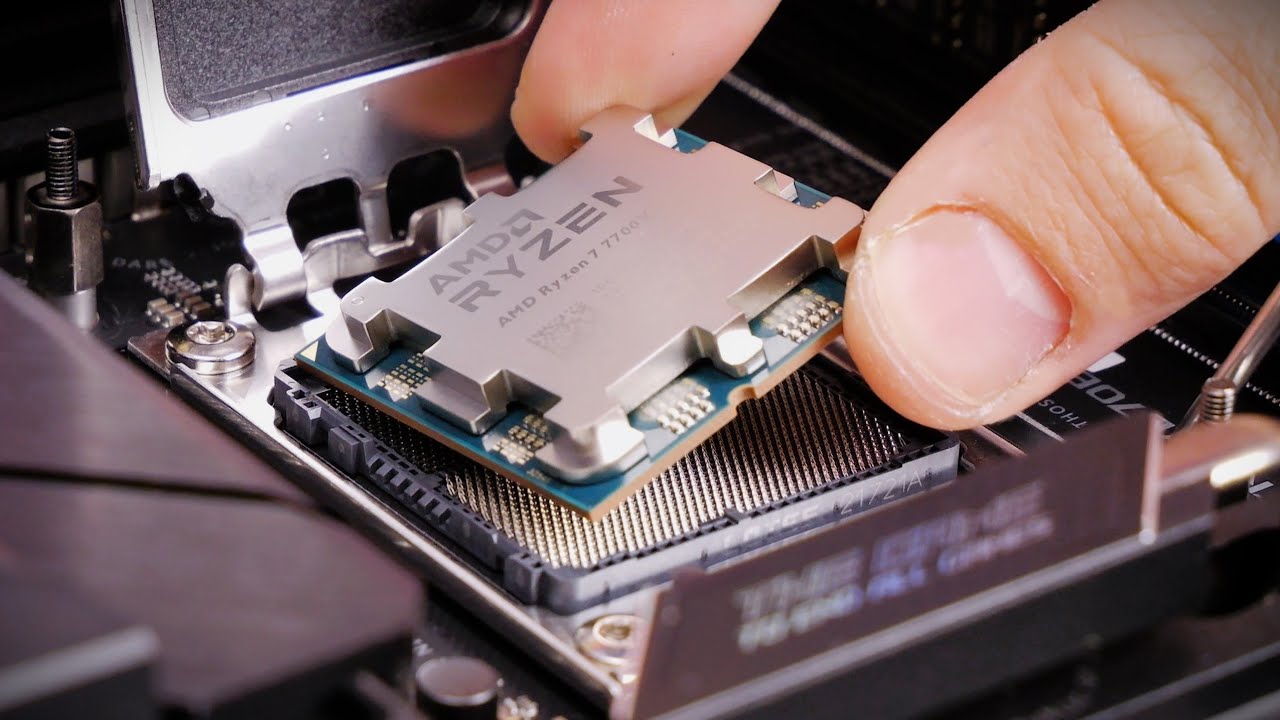
Aligning Cpu With Socket
Look for the small triangle on the CPU corner. Match this triangle with the one on the socket. This shows the correct orientation. Do not force the CPU into the socket. It should fit easily when aligned right.
Seating Cpu Properly
Lower the CPU straight down into the socket. Avoid tilting or sliding the CPU sideways. Check if the CPU sits flat and even. A proper seat means all pins connect well to the socket.
Securing The Retention Arm
Push the retention arm down slowly. Lock it under the hook on the socket. This holds the CPU firmly in place. Make sure the arm is tight but do not use extra force. The CPU should not move after securing.
Applying Thermal Paste
Applying thermal paste is a key step when installing your AM5 CPU. It helps transfer heat from the CPU to the cooler. This keeps your processor running cool and prevents damage.
Using the right thermal paste and applying it correctly improves your computer’s performance. Below are some tips for choosing and applying thermal paste properly.
Choosing The Right Thermal Paste
Select a thermal paste that fits your budget and needs. Most users choose either ceramic or metal-based pastes. Ceramic pastes are good for regular use and safe for most CPUs. Metal-based pastes offer better heat transfer but require careful application.
Pick a paste that is easy to apply and clean. Avoid old or dried-out thermal paste. Check product reviews to find reliable brands.
Applying An Even Layer
Clean the CPU surface before applying any paste. Use isopropyl alcohol and a lint-free cloth. Apply a small pea-sized drop in the center of the CPU.
When you attach the cooler, it spreads the paste evenly. Avoid adding too much paste. Too much can cause overheating. Too little paste may not cover the surface properly.
Press the cooler down gently but firmly. This ensures the paste spreads in a thin, even layer. The goal is full contact between the CPU and cooler.

Credit: wccftech.com
Attaching Cpu Cooler
Attaching the CPU cooler is a key step in installing your AM5 CPU. The cooler keeps the processor at a safe temperature. Without proper cooling, your CPU might overheat and stop working. Follow clear steps to attach the cooler correctly. This ensures your system runs smoothly and lasts longer.
Positioning The Cooler
Place the cooler directly on the CPU surface. Align it with the mounting holes on the motherboard. Make sure the thermal paste covers the CPU evenly. Avoid shifting the cooler after placing it down. A good position helps in better heat transfer.
Securing The Cooler Firmly
Use the screws or clips that came with your cooler. Tighten them evenly in a diagonal pattern. This spreads pressure across the CPU for a secure fit. Do not overtighten, as this can damage the motherboard. The cooler should feel stable without movement.
Connecting Cooler Fan To Motherboard
Locate the CPU fan header on the motherboard. It is usually labeled as “CPU_FAN.” Plug the cooler fan cable into this header. Ensure the connector fits snugly and locks in place. This connection powers the fan and controls its speed.
Final Checks And Power On
After installing your AM5 CPU, the final checks and powering on are crucial steps. These steps ensure your build works correctly and safely. Taking time here helps avoid damage and saves troubleshooting later.
Careful inspection of all connections and components is necessary. Once confident, you can power on your PC and check if the CPU runs properly. This part is simple but important.
Double-checking Connections
Look closely at all cable connections. Make sure the CPU power cable is firmly plugged in. Check the motherboard power connectors too. Verify the CPU cooler is attached and connected to the right header. Loose cables cause problems or prevent booting.
Inspect RAM sticks for proper seating. Press down gently until they click. Confirm the GPU is seated correctly if installed. Ensure no foreign objects or cables block fans or sockets. Take a moment to review everything carefully.
Booting Up And Verifying Installation
Press the power button and watch the PC start. Listen for any unusual noises. The fans should spin smoothly. If the screen stays black, double-check connections again.
Enter the BIOS menu by pressing the key shown on the screen. Look for CPU temperature and clock speed. These readings show the CPU is working. Check memory is recognized and running at the right speed. If all looks good, your installation succeeded.
Frequently Asked Questions
What Tools Do I Need To Install An Am5 Cpu?
You need a screwdriver, thermal paste, and an anti-static wrist strap. These tools ensure safe and secure installation of the AM5 CPU.
How To Handle The Am5 Cpu Safely During Installation?
Hold the CPU by its edges, avoid touching pins or contacts. This prevents damage and ensures proper functionality after installation.
Can I Install Am5 Cpu Without Replacing The Motherboard?
No, AM5 CPUs require compatible AM5 motherboards. Older motherboards do not support AM5 socket and features.
What Is The Correct Orientation For Installing The Am5 Cpu?
Align the CPU’s triangle marker with the motherboard socket’s triangle. This ensures proper seating and prevents damage during installation.
Conclusion
Installing an AM5 CPU is simple with clear steps. Start by preparing your workspace clean and static-free. Handle the CPU carefully and place it gently into the socket. Secure the CPU and attach the cooler firmly. Double-check all connections before powering on your system.
Take your time and follow the instructions closely. This ensures your computer runs smoothly and lasts longer. Enjoy your upgraded system’s improved performance and speed.