
Are you facing issues with your graphics card or planning to upgrade your GPU? One of the first steps you need to take is to remove your current GPU driver properly.
If you don’t do this right, you might run into crashes, glitches, or poor performance. But don’t worry—removing a GPU driver doesn’t have to be confusing or complicated. In this guide, you’ll learn the easiest and safest way to uninstall your GPU driver, step by step.
Keep reading to make sure your system stays clean and ready for the next install without any hidden problems.
Credit: www.guru3d.com
Prepare For Driver Removal
Preparing to remove your GPU driver is an important step. It helps avoid problems and keeps your system safe. Taking a few simple actions can make the process smooth and easy.
Follow these steps carefully before you remove the driver. This way, you protect your data and system settings.
Backup Important Data
Save your important files to a safe place. Use an external drive or cloud storage. This protects your data from accidental loss.
Backups help if something goes wrong during driver removal. You can restore your files quickly.
Download Latest Drivers
Get the newest GPU drivers from the official website. Keep them ready on your computer.
Having the latest drivers helps you install them right after removal. This keeps your system running well.
Create System Restore Point
Create a restore point on your computer before removing the driver. This saves your current system state.
If problems happen later, you can return to this safe point. It is a simple way to protect your system.

Credit: vixencomposites.com
Uninstall Through Device Manager
Uninstalling your GPU driver through Device Manager is a direct and safe method. It helps remove old or corrupted drivers before installing new ones. This process does not need extra software and works on all Windows versions.
Follow these clear steps to access Device Manager, find your GPU device, and uninstall its driver easily. This method ensures your system stays clean and ready for a fresh driver installation.
Access Device Manager
Press the Windows key and the letter R at the same time. This opens the Run dialog box. Type devmgmt.msc and press Enter. The Device Manager window will open.
You can also right-click the Start button and select Device Manager from the menu. This tool shows all hardware connected to your computer.
Locate Gpu Device
In Device Manager, find the category named Display adapters. Click the arrow next to it to expand the list. Your GPU will appear here, usually named by the manufacturer like NVIDIA or AMD.
Make sure you pick the correct device. This step is important to avoid uninstalling other hardware drivers.
Uninstall Driver
Right-click your GPU device and select Uninstall device. A confirmation box appears. Check the option to delete the driver software if available.
Click Uninstall to remove the driver. Wait a moment while Windows deletes the files. Restart your computer to complete the process.
Use Dedicated Uninstaller Tools
Removing a GPU driver can be tricky. Using dedicated uninstaller tools makes the process easier and cleaner. These tools remove all driver files and settings without leaving leftovers. They help avoid driver conflicts and improve system stability. Follow these steps to use a dedicated uninstaller tool effectively.
Download Display Driver Uninstaller
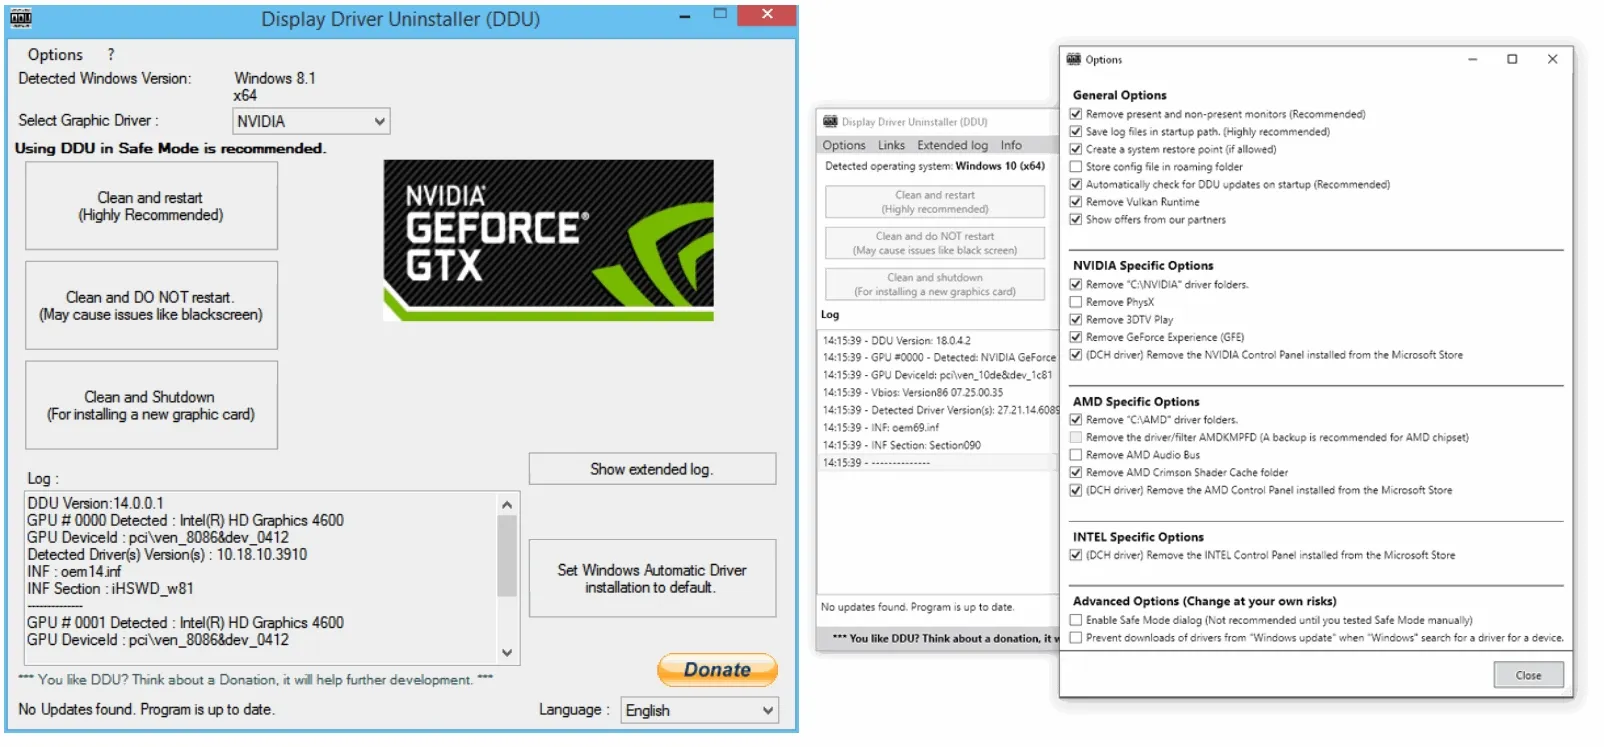
Start by downloading Display Driver Uninstaller (DDU). It is a free and trusted tool designed for GPU driver removal. Download it from the official website or a reliable source. Avoid third-party sites to prevent malware risks. Save the file in an easy-to-find folder on your computer.
Run Uninstaller In Safe Mode
Boot your PC into Safe Mode for better cleaning. Safe Mode stops unnecessary programs and drivers from running. Open DDU and select your GPU brand, like NVIDIA or AMD. Click the uninstall button and wait for the process to finish. Restart your computer normally after the removal completes.
Clean Residual Files
Even after uninstalling, some files may remain. Use DDU or a file cleaner tool to remove these leftovers. Check common folders like Program Files and System32 for leftover files. Delete any remaining GPU driver folders manually if needed. This step ensures a fresh install for your new drivers.

Credit: kaz-metiz.com
Remove Drivers Manually
Removing GPU drivers manually helps fix driver issues and clean your system. It gives you control over every file and setting related to the driver. This process takes time but ensures no leftover files cause problems later.
Manual removal works well when automatic tools fail or you want a fresh driver install. Follow these steps carefully to avoid harming your system.
Delete Driver Files
Start by deleting driver files from your computer. Open File Explorer and go to C:WindowsSystem32DriverStoreFileRepository. Find folders starting with your GPU driver’s name.
Right-click these folders and select Delete. This removes the core driver files. Be sure not to delete unrelated folders to avoid errors.
Clean Registry Entries
Next, clean the registry to remove driver settings. Press Win + R, type regedit, and hit Enter. Backup your registry before making changes.
Search for keys related to your GPU driver using keywords like the driver name or manufacturer. Delete these keys carefully. This step clears old configuration and prevents conflicts.
Clear Temporary Files
Temporary files can store driver data. Press Win + R, type %temp%, and hit Enter. This opens the temp folder.
Select all files and delete them. Empty the Recycle Bin afterward. Removing temp files frees space and stops old driver data from causing trouble.
Reboot And Verify Removal
After uninstalling your GPU driver, rebooting your computer is essential. This step helps the system clear out old files and settings. It ensures the driver is fully removed. Verifying removal confirms your system is ready for a fresh installation or troubleshooting.
Restart Your Computer
Save all your work before restarting. Click the Start menu, then select Restart. Let the system shut down and power back on. Restarting clears temporary files and resets hardware connections. This step helps remove any driver components still running.
Check Device Manager Status
Open Device Manager by right-clicking the Start button. Choose Device Manager from the list. Expand the Display adapters category to find your GPU. Look for any warning signs or unknown devices. This view shows if Windows still detects the old driver.
Confirm Driver Absence
Right-click your GPU and select Properties. Go to the Driver tab and check the driver version. If no driver is listed or it shows a generic one, removal was successful. You can also see if the device is working correctly here.
Install New Gpu Drivers
Installing new GPU drivers is an important step after removing old ones. It helps your computer use the graphics card correctly. New drivers improve performance and fix bugs. Follow these simple steps to install the correct drivers for your GPU.
Download Compatible Drivers
First, find the right drivers for your graphics card model. Visit the official website of your GPU maker. Enter your GPU details like model number and operating system. Download the latest version available. This ensures the best compatibility and performance.
Run Installation Setup
Open the downloaded file to start the installation process. Follow the instructions on the screen carefully. Choose the type of installation if prompted. A clean installation option removes old files for a fresh start. Wait patiently until the setup finishes.
Restart After Installation
Restart your computer after installing new drivers. This step allows the system to apply changes properly. Your GPU will now run with the updated software. Check if the new drivers work by opening your graphics settings.
Frequently Asked Questions
How Do I Uninstall A Gpu Driver Safely?
To uninstall a GPU driver safely, use Device Manager or specialized software like Display Driver Uninstaller. First, boot into Safe Mode. Then, remove the driver completely to avoid conflicts. Restart your computer after uninstallation to apply changes properly.
When Should I Remove A Gpu Driver?
Remove a GPU driver if it’s corrupted, outdated, or causing performance issues. Also, uninstall before installing a new GPU or updating to a different driver version. This ensures a clean installation and optimal GPU performance.
Can I Remove Gpu Drivers Without Losing Data?
Yes, uninstalling GPU drivers does not delete your personal data. It only removes the software controlling your graphics card. However, always back up important files before making system changes to avoid any accidental data loss.
What Tools Help Remove Gpu Drivers Completely?
Display Driver Uninstaller (DDU) is a popular tool for complete GPU driver removal. It removes all files, registry entries, and driver remnants safely. Using DDU ensures no leftover files interfere with new driver installations.
Conclusion
Removing a GPU driver is simple with the right steps. Always back up important files before starting. Use official tools or software for best results. Clean removal helps avoid future driver conflicts. Restart your computer after uninstalling the driver. Then, install the new driver carefully.
This keeps your system running smoothly and fast. Follow these tips to fix driver issues easily. No need to worry about errors or crashes. Just take it slow and check each step. Your PC will thank you for the care.