
Are you struggling to connect your monitor to your CPU? It might seem tricky at first, but once you know the simple steps, it becomes quick and easy.
Connecting your monitor the right way ensures you get the best display quality without any hassle. In this guide, you’ll learn exactly how to set everything up, avoid common mistakes, and get your screen working perfectly. Keep reading, and by the end, you’ll feel confident handling your own setup like a pro.
Choosing The Right Monitor
Choosing the right monitor is important for a good computer experience. The monitor shows all your work, games, and videos. Picking the right one helps you see everything clearly and enjoy your tasks. This guide explains the main things to consider when selecting a monitor.
Types Of Monitors
There are several types of monitors. LCD monitors are common and affordable. LED monitors are a type of LCD with better lighting and colors. OLED monitors show deeper blacks and bright colors but cost more. Choose a type that fits your budget and needs.
Resolution And Size
Resolution means how many pixels the screen shows. Higher resolution gives sharper images. Common options are 1080p, 1440p, and 4K. Screen size matters too. Bigger screens show more details but need more space. Pick a size that fits your desk and helps you work comfortably.
Refresh Rate And Response Time
Refresh rate tells how many times the screen updates each second. Higher rates, like 75Hz or 144Hz, make motion look smoother. Response time shows how fast pixels change color. Lower response times reduce blur in fast scenes. These features matter for gaming and video watching.
Credit: docs.oracle.com
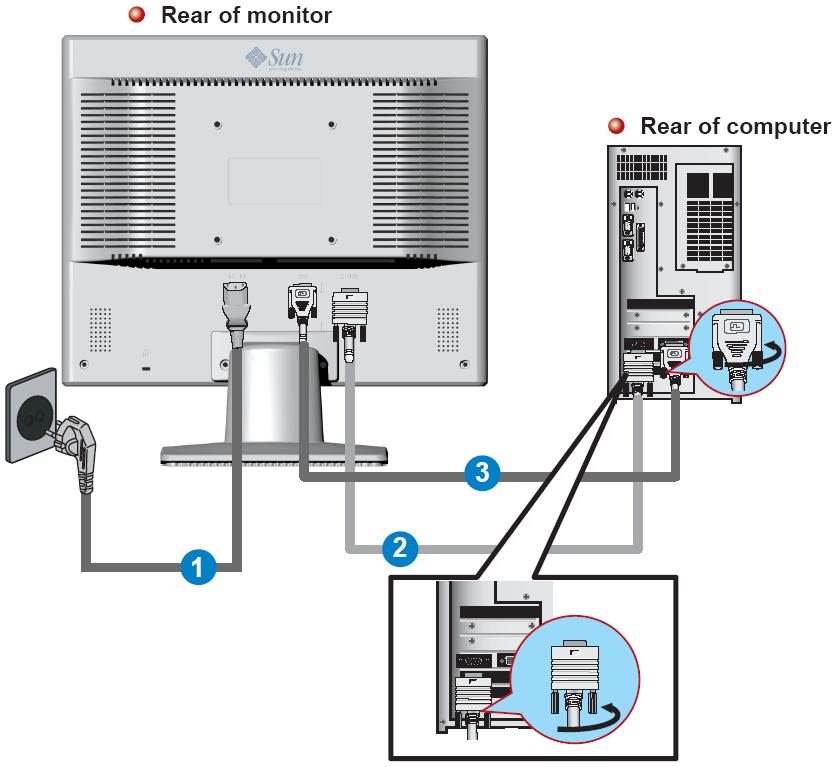
Checking Cpu Video Ports
Checking the video ports on your CPU is the first step to connect your monitor. These ports are where you plug in the cable that links your monitor to the CPU. Different CPUs have different types of video ports. Knowing which ports your CPU has helps you pick the right cable and monitor input.
Look at the back of your CPU. You will see several ports grouped together. Some of these ports are for video output. Identifying these ports saves time and avoids confusion during setup.
Common Video Output Ports
Most CPUs have one or more common video output ports. The HDMI port is very popular. It carries both video and audio signals. Another common port is DisplayPort. It supports high resolutions and refresh rates. VGA is an older port but still used in some systems. It only sends video and is analog. DVI is also common and delivers good video quality. Each port has a different shape and size. Recognizing them helps you find the right cable quickly.
Compatibility With Monitor Inputs
Your monitor must have an input port that matches the CPU’s output port. Many monitors have HDMI and DisplayPort inputs. Some older monitors use VGA or DVI inputs. Check the monitor’s input options before buying a cable. Using the same type of port on both devices gives the best quality. If ports don’t match, you may need an adapter or converter. Simple adapters work for similar signals, like HDMI to DVI. Complex conversions need special devices. Always check compatibility to avoid connection problems.
Selecting The Appropriate Cable
Selecting the appropriate cable is essential for connecting your monitor to your CPU. The right cable ensures a clear picture and smooth performance. Different cables support various resolutions and refresh rates. Choosing the correct type and quality can prevent display issues and improve your experience.
Hdmi Vs Displayport Vs Vga
HDMI and DisplayPort are digital cables. They offer sharp images and support high resolutions. HDMI is common in TVs and many monitors. DisplayPort works well with computers and supports higher refresh rates. VGA is an older, analog cable. It gives lower image quality and is less common today. Choose HDMI or DisplayPort for the best results.
Cable Length And Quality
Cable length affects signal quality. Long cables may cause a weaker signal. Keep cable length under 15 feet for clear images. Use high-quality cables with good shielding. They reduce interference and signal loss. Cheap cables might cause flickering or no display. Invest in reliable cables to avoid connection problems.
Credit: softwareg.com.au
Connecting The Monitor To Cpu
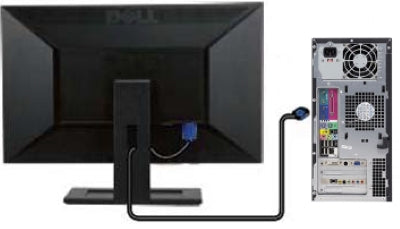
Connecting a monitor to a CPU is a simple task. It allows you to see the computer’s display clearly. Follow these steps carefully for a smooth setup. Proper connection ensures good video quality and device safety.
Powering Off Devices
Before connecting, turn off both the monitor and CPU. This prevents electrical damage. Unplug the power cables from both devices. Wait a few seconds to let them shut down completely. This step keeps your devices safe during connection.
Plugging In Video Cable
Find the right video cable for your monitor and CPU. Common types include HDMI, VGA, and DisplayPort. Match the cable ports on both devices. Gently insert one end into the monitor port. Connect the other end to the CPU’s video output. Make sure the cable fits snugly without force.
Securing Connections
Check that all cables are firmly connected. Loose cables can cause flickering or no display. Tighten any screws or clips on the cable ends if available. Keep cables away from sharp edges or heavy objects. This prevents damage and ensures a stable connection.
Configuring Display Settings
Configuring display settings is an important step after connecting your monitor to the CPU. It ensures the screen looks clear and works well. Proper settings help reduce eye strain and improve your viewing experience.
Adjusting the settings is easy. You can change the screen resolution, set up multiple displays, and adjust color and brightness. These tweaks make the display comfortable and suited to your needs.
Adjusting Resolution
Resolution means how many pixels show on the screen. Higher resolution gives sharper images. To adjust it, open the display settings on your computer. Choose the resolution that fits your monitor. Use the recommended option for best results.
Setting Multiple Displays
Multiple displays let you use more than one screen. This helps with work and multitasking. Connect the second monitor to your CPU. Then, go to display settings and select how you want the screens to work. You can duplicate the screen or extend it.
Calibrating Color And Brightness
Colors and brightness affect how the screen looks. Calibrating them makes the display comfortable for your eyes. Use the built-in calibration tools on your computer. Adjust the brightness so it is not too bright or too dark. Set the color balance for natural images.

Credit: www.youtube.com
Troubleshooting Common Issues
Connecting a monitor to a CPU usually works smoothly. Sometimes, issues appear that stop the display from working right. Troubleshooting these problems helps you fix them quickly. This saves time and avoids frustration.
Below are common issues and simple steps to solve each one. Follow these tips to get your monitor working perfectly again.
No Signal On Monitor
The monitor shows “No Signal” when it does not receive a video input. First, check if the cable is firmly plugged into both the CPU and monitor. A loose connection often causes this problem.
Try using a different cable to rule out a faulty wire. Also, make sure the CPU is turned on and not in sleep mode. Lastly, select the correct input source on the monitor using its menu buttons.
Incorrect Resolution
The screen looks blurry or parts are cut off when the resolution is wrong. Open your computer’s display settings and set the resolution to the monitor’s native size. This is the best resolution for sharp images.
If the resolution options are limited, update your graphics driver. Outdated drivers can cause display problems. Restart the computer after making changes to apply them fully.
Display Flickering
Flickering means the screen blinks or changes brightness quickly. This can happen due to a bad cable or loose connection. Replace the cable or reconnect it firmly to solve this.
Sometimes, flickering comes from a conflict with the refresh rate. Check the display settings and set the refresh rate to match the monitor’s recommended value. A stable refresh rate stops flickering and makes viewing comfortable.
Frequently Asked Questions
How Do I Connect A Monitor To A Cpu?
To connect a monitor to a CPU, use the appropriate cable (HDMI, VGA, or DisplayPort). Plug one end into the monitor and the other into the CPU’s port. Turn on both devices and adjust display settings if needed.
Which Cable Is Best For Cpu To Monitor Connection?
HDMI cables are best for high-definition video and audio. DisplayPort is also excellent for high resolutions. VGA is older and supports only basic video quality. Choose based on your monitor and CPU ports for optimal performance.
Can I Connect Multiple Monitors To One Cpu?
Yes, you can connect multiple monitors if your CPU supports multiple video outputs. Use available ports like HDMI, DisplayPort, or VGA. You may need adapters or a docking station for additional monitors.
What If My Monitor Doesn’t Display After Connecting?
Check cable connections for secure fitting. Ensure the monitor and CPU are powered on. Verify the correct input source is selected on the monitor. Update your graphics drivers if the problem persists.
Conclusion
Connecting a monitor to a CPU is simple and quick. Choose the right cable for your devices. Plug the cable securely into both the monitor and CPU. Turn on the monitor and then the computer. Adjust the display settings for the best view.
Now you can enjoy your screen clearly. No need to worry about complicated steps. Just follow these easy tips, and you’re ready to go. This basic skill helps with work, study, and fun. Try it yourself and see how easy it is.