
Is your Windows 10 computer running slow or overheating? High CPU usage could be the reason behind these frustrating issues.
When your CPU is overloaded, your system becomes sluggish, apps freeze, and tasks take longer than they should. But don’t worry—you can fix this. You’ll discover simple and effective ways to reduce CPU usage on your Windows 10 PC. By following these easy steps, you’ll speed up your computer and get it running smoothly again.
Keep reading, and take control of your system’s performance today!
Identify High Cpu Usage
High CPU usage can slow down your Windows 10 computer. Identifying which programs use most CPU helps fix this. You can find these details using built-in tools. They show which tasks take more power and affect speed.
Start by checking simple tools. Later, explore detailed monitors for deeper insights. This process helps keep your PC running smoothly.
Use Task Manager
Task Manager shows active programs and their CPU use. Open it by pressing Ctrl + Shift + Esc. Click the “Processes” tab to see CPU usage per app. Sort by CPU column to find heavy users quickly. This tool helps spot apps that slow your PC.
You can end tasks that use too much CPU here. Right-click the app and select “End task.” Be careful not to stop system processes. Use Task Manager often to keep tabs on CPU load.
Check Resource Monitor
Resource Monitor gives more details about CPU use. Open it from Task Manager under the “Performance” tab, then “Open Resource Monitor.” It shows CPU use by service and process. You see which background tasks use CPU too.
This tool helps find hidden causes of high CPU. Watch for processes with high CPU spikes. Use this info to decide which tasks to stop or manage. Resource Monitor adds a deeper layer of control.
Disable Startup Programs
Disabling startup programs helps lower CPU usage in Windows 10. Many apps start automatically and use CPU power. Stopping unnecessary programs can make your PC faster. It also frees up memory and improves overall system performance.
Manage Startup Apps
To manage startup apps, open Task Manager by pressing Ctrl + Shift + Esc. Click the Startup tab to see a list of programs. Check the status of each app. Right-click any app you do not need at startup. Select Disable to stop it from running automatically.
Focus on apps with high startup impact. Disabling these reduces CPU load during boot. Some programs restart later if needed. You can always enable them again.
Use System Configuration
System Configuration is another tool to control startup programs. Press Windows + R keys and type msconfig. Hit Enter to open the window. Go to the Startup tab and click Open Task Manager. Disable unwanted programs here.
This method also helps identify hidden startup items. Use it carefully to avoid stopping essential services. Disabling unnecessary apps speeds up your system and lowers CPU use.
Optimize Background Processes
Optimizing background processes is key to reducing CPU usage in Windows 10. Many apps and services run quietly in the background. They use CPU power without you noticing. Controlling these can free up resources and speed up your PC.
Limit Background Apps
Some apps keep running even when you do not use them. These apps consume CPU and memory. To limit them, open Settings and go to Privacy. Click on Background apps. Turn off apps you don’t need running all the time. This simple step lowers CPU load and saves battery life.
Adjust Windows Services
Windows runs many services to support features and programs. Not all services are necessary for daily tasks. Open the Services app by typing “services.msc” in the search box. Look for services with “Manual” or “Automatic” startup type. Change unnecessary services to “Manual” or “Disabled” to reduce CPU use. Be careful not to stop essential services. This adjustment helps your system run smoother and faster.
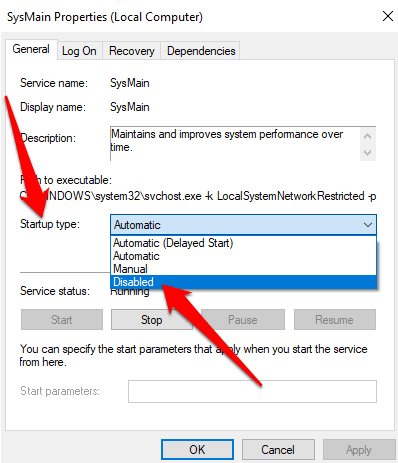
Credit: helpdeskgeek.com
Update Device Drivers
Updating device drivers helps keep your computer running smoothly. Old or faulty drivers can cause high CPU usage. Updating them can fix bugs and improve performance. This step often solves many system slowdowns.
Check For Driver Updates
Start by checking if your drivers need updates. Windows 10 can do this automatically. Go to Settings and open Update & Security. Click on Windows Update and select Check for updates. If there are driver updates, Windows will download and install them.
Use Device Manager
Device Manager lets you update drivers manually. Press Windows key + X and choose Device Manager. Find the device with the old driver. Right-click it and select Update driver. Then click Search automatically for updated driver software. Windows will find and install the latest driver if available.
Scan For Malware
High CPU usage can slow down your Windows 10 PC. Malware often causes this problem. Scanning for malware helps find and remove harmful software. This step is crucial to keep your system fast and safe.
Run Windows Defender
Windows Defender is built into Windows 10. It protects your PC from viruses and malware. To run a scan, open Windows Security. Click on “Virus & threat protection.” Choose “Quick scan” to check common areas. For a deeper check, select “Full scan.” Follow the instructions to remove any threats found.
Use Third-party Tools
Other antivirus tools can also scan for malware. Some popular options include Malwarebytes and Avast. These tools offer free and paid versions. Download and install one from the official site. Run a full system scan to detect hidden threats. Remove or quarantine any malware detected. These extra tools add another layer of protection.

Credit: www.avast.com
Adjust Power Settings
Adjusting power settings in Windows 10 helps control CPU usage effectively. This method balances performance and energy consumption. It reduces CPU strain, which lowers heat and saves battery on laptops. Simple tweaks can make your computer run smoother and last longer.
Choose Balanced Or Power Saver
Select a power plan that fits your needs. The Balanced plan offers good performance with moderate energy use. It adjusts CPU speed based on tasks. The Power Saver plan reduces CPU speed to save energy. It works well for basic tasks and extends battery life. Avoid using the High Performance plan as it keeps CPU running at full speed, causing higher usage and heat.
Customize Advanced Power Options
Open the Advanced Power Options to fine-tune settings. Lower the maximum processor state to reduce CPU load. For example, set it to 80-90% to prevent full CPU speed. This change cuts down power consumption without hurting performance much. You can also turn off turbo boost if available. These tweaks help keep CPU usage low and prevent overheating.
Manage Windows Updates
Managing Windows Updates is key to controlling CPU usage on Windows 10. Updates run in the background and can consume a lot of resources. Stopping or scheduling updates helps reduce this load. You can also fix issues that cause updates to use excessive CPU power. Both steps keep your PC running smoothly.
Pause Or Schedule Updates
Windows 10 lets you pause updates temporarily. This stops the system from downloading and installing updates. Go to Settings, then Update & Security, and select Pause updates for up to 35 days.
Scheduling updates is another option. Choose a time when you do not use your computer. This way, updates run without slowing down your work. Set active hours to tell Windows when not to restart for updates.
Fix Update-related Issues
Sometimes updates cause high CPU usage due to errors. Running the Windows Update Troubleshooter can find and fix these problems. Open Settings, go to Update & Security, then Troubleshoot, and select Windows Update.
Clearing the update cache also helps. Stop the Windows Update service, delete the cache files in the SoftwareDistribution folder, and restart the service. This removes corrupted files that slow down your PC.
Clean Temporary Files
Temporary files can slow down your CPU by using extra space and resources. These files build up from everyday tasks and programs. Clearing them often helps your computer run smoother and faster. It also frees up storage and reduces CPU load.
Use Disk Cleanup
Disk Cleanup is a built-in tool in Windows 10. It helps remove temporary files safely. To use it, type “Disk Cleanup” in the search bar. Open the app and select the drive to clean, usually the C: drive. The tool will scan for files to delete. Check “Temporary files” and other unnecessary items. Click “OK” to remove them. This process clears space and eases CPU usage.
Clear Browser Cache
Browsers save files to load websites faster. These files, called cache, can grow large over time. Clearing the cache reduces CPU work and speeds up browsing. Open your browser’s settings or options menu. Find the section for privacy or history. Select “Clear browsing data” or “Clear cache.” Choose the time range, like “All time,” for a full clean. Confirm to delete the cache. This step helps lower CPU usage during internet use.
Increase Virtual Memory
Increasing virtual memory can help reduce high CPU usage in Windows 10. Virtual memory uses hard drive space to extend your computer’s RAM. This process allows the system to handle more tasks without slowing down. Adjusting virtual memory settings can improve performance and reduce CPU load.
Adjust Paging File Size
Open System Properties from the Control Panel. Click on “Advanced system settings” and go to the “Advanced” tab. Under Performance, click “Settings,” then go to the “Advanced” tab again. Click “Change” under Virtual Memory. Uncheck “Automatically manage paging file size.” Select the drive and choose “Custom size.” Set the Initial and Maximum size values. Use recommended sizes or increase them for better performance. Click “Set” and then “OK” to save changes. Restart your computer to apply the new settings.
Monitor Performance Impact
After increasing virtual memory, watch your system’s performance closely. Open Task Manager and check CPU usage during regular tasks. Notice if your computer runs smoother or slower. If CPU usage drops, the change helps. If performance worsens, try different paging file sizes. Keep an eye on disk usage as well. Virtual memory relies on the hard drive, so high disk activity can affect speed. Adjust settings as needed for the best balance.
Use Performance Troubleshooter
Using the Performance Troubleshooter in Windows 10 helps find problems that cause high CPU use. This tool scans your system for issues that slow it down. It then suggests ways to fix these issues. Running this troubleshooter is simple and can improve your computer’s speed.
Run Built-in Tool
Open the Control Panel from the Start menu. Click on “System and Security.” Select “Security and Maintenance.” Find “Troubleshooting” and click it. Choose “Run maintenance tasks” under System and Security. The tool will start scanning your computer for performance problems. Wait for it to finish the scan.
Apply Suggested Fixes
After the scan, the troubleshooter shows a list of detected issues. Review each suggestion carefully. Click “Apply this fix” to solve the problems one by one. Restart your computer to make sure the changes take effect. Check your CPU usage again. It should be lower now.

Credit: www.avg.com
Frequently Asked Questions
How Can I Check Cpu Usage On Windows 10?
Open Task Manager by pressing Ctrl + Shift + Esc. Click the “Performance” tab. Select “CPU” to see real-time usage details.
What Causes High Cpu Usage In Windows 10?
High CPU usage often stems from background apps, malware, outdated drivers, or system updates running. Identifying these helps in reducing CPU load.
How Do I Disable Startup Programs To Reduce Cpu Usage?
Open Task Manager, go to the “Startup” tab, and disable unnecessary programs. This prevents them from consuming CPU during boot.
Can Updating Windows 10 Reduce Cpu Usage?
Yes, updating Windows 10 can fix bugs and improve system performance, which helps lower CPU usage and enhance stability.
Conclusion
Reducing CPU usage in Windows 10 keeps your computer fast and smooth. Close unnecessary programs and check for updates often. Use Task Manager to find and stop heavy tasks. Adjusting startup apps helps your PC run better. Clean your system regularly to avoid slowdowns.
Small steps can make a big difference in performance. Keep your PC healthy and enjoy faster work every day. Simple changes lead to a better Windows 10 experience. Try these tips and see how your CPU behaves.