
Is your computer acting up, showing glitches, or failing to recognize your graphics card? You might not need a costly repair or a new GPU just yet.
Sometimes, all your graphics card needs is a simple reseat. Reseating your GPU can fix many common problems and boost your system’s performance without any hassle. In this guide, you’ll learn exactly how to reseat your GPU safely and quickly, even if you’re not a tech expert.
Keep reading, and you’ll have your graphics card running smoothly again in no time.
Signs Your Gpu Needs Reseating
Knowing when your GPU needs reseating can save you time and frustration. A loose or poorly connected GPU often causes several noticeable problems. These signs point to connection issues that reseating can fix. Watch for these symptoms to keep your computer running smoothly.
Common Performance Issues
Your computer may slow down during games or heavy tasks. Frame rates drop, and programs lag more than usual. Sometimes, the GPU might not be detected at all. These problems often mean the GPU is not seated correctly. Checking the connection can help restore normal performance.
Visual Artifacts And Crashes
Strange lines, shapes, or colors appear on the screen. Games or apps may crash without warning. The display might flicker or go black for a moment. Such visual problems suggest the GPU is losing contact. Reseating the card often stops these issues from happening.
Overheating Symptoms
The GPU fan runs loudly or constantly at high speed. The computer shuts down suddenly or restarts to protect itself. Heat feels stronger near the GPU area. These signs show the card might not be seated well, causing poor cooling. Reseating the GPU can improve airflow and reduce heat.
Credit: support.buildredux.com
Preparing To Reseat Your Gpu
Preparing to reseat your GPU is a key step before opening your computer. It helps protect your hardware and ensures the process goes smoothly. Taking time to prepare can save you from damage and frustration later.
Follow these steps carefully to get ready for reseating your graphics card safely.
Gathering Necessary Tools
Start by collecting the right tools. You will need a small screwdriver, usually a Phillips-head, to remove screws. A clean, flat surface is helpful to place your tools and screws. Have a soft cloth or an anti-static mat ready to rest the GPU on.
Powering Down Safely
Turn off your computer completely before touching any parts. Unplug the power cable from the wall socket. Press the power button for a few seconds to discharge leftover power. This step helps avoid electrical shocks and protects your components.
Grounding Yourself To Avoid Static
Static electricity can damage your GPU and other parts. Touch a metal object connected to the ground to discharge static from your body. Use an anti-static wrist strap if available. Avoid working on carpeted floors to reduce static build-up.
Removing The Gpu
Removing the GPU is the first step to reseating it properly. This process needs care to avoid damage. Follow the steps carefully to take out the GPU safely. Take your time and be gentle.
Opening The Pc Case
Start by turning off your computer and unplugging it. Place the PC on a clean, flat surface. Remove the screws or latches holding the side panel. Slide or lift the panel off to open the case. Now, you have clear access to the inside of your PC.
Disconnecting Power Cables
Look for the power cables connected to the GPU. These are usually thick cables with a clip or latch. Press the latch gently and pull the cable out. Do this carefully to avoid breaking the clip. Make sure all power cables are disconnected before moving on.
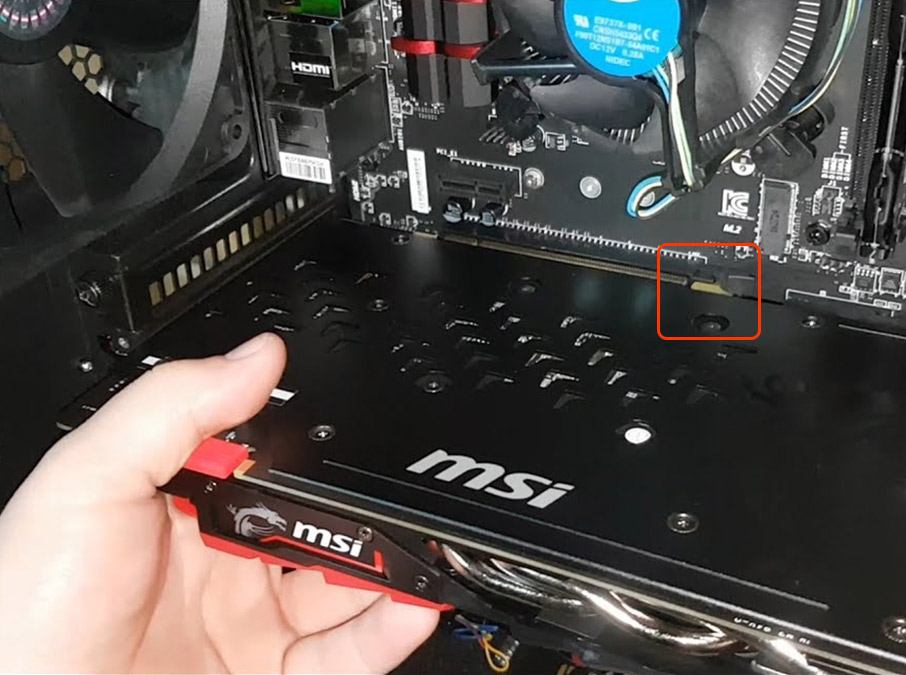
Releasing The Gpu From The Slot
Find the small locking clip at the end of the PCIe slot. This clip holds the GPU firmly in place. Press or pull the clip to release the GPU. Hold the GPU with both hands and pull it straight out. Avoid wiggling or forcing it to prevent damage.
Cleaning The Gpu And Slot
Cleaning the GPU and its slot is an important step before reseating. Dust and dirt can cause poor connections and overheating. Keeping these parts clean helps your graphics card work well and last longer.
Removing Dust And Debris
Start by gently removing dust from the GPU and slot. Use a soft brush or a clean, dry cloth. Avoid using anything wet or sticky. Clear away all visible dust to improve contact and airflow.
Inspecting For Damage
Look closely at the GPU and slot for any signs of damage. Check for bent pins, cracks, or burnt marks. Damaged parts can cause problems and may need repair or replacement. Be careful not to touch delicate parts with your fingers.
Using Compressed Air Safely
Use compressed air to blow out dust from tight spaces. Hold the can upright to avoid spraying liquid. Keep a short burst of air and do not shake the can. Blow air into the slot and on the GPU’s surface. This helps remove hidden dust without causing damage.
Reinstalling The Gpu
Reinstalling the GPU is an important step after removing it. It helps ensure the card works well and fits safely inside your computer. Take your time to place it correctly and connect everything firmly. This helps avoid damage and improves the computer’s performance.
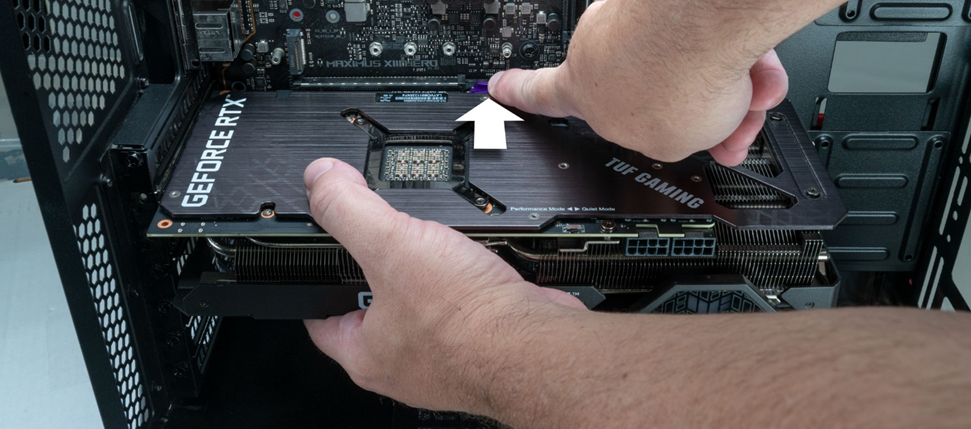
Aligning The Gpu Correctly
First, check the GPU slot on the motherboard. Make sure it is clean and free of dust. Hold the GPU by its edges. Line up the card’s connector with the slot carefully. The metal contacts must fit straight into the slot. Do not force the card. Press down gently but firmly until it clicks into place.
Securing The Card In Place
Once the GPU is in the slot, secure it with screws. Use the screws that came with your case or GPU. Tighten them just enough to hold the card steady. Avoid overtightening, which can damage the card or case. Properly secured, the GPU will not move or wobble inside the case.
Reconnecting Power Connectors
Locate the power connectors on your GPU. Most cards need one or two cables from the power supply. Plug each cable into the matching connector on the GPU. Make sure each connection is firm and clicks into place. Loose connections can cause power issues or prevent the card from working.
Credit: support.cyberpowerpc.com
Testing After Reseating
After reseating your GPU, testing is essential to ensure it works properly. This step confirms the card is securely connected and performs as expected. Careful testing helps avoid future issues and keeps your PC running smoothly.
Booting Up The Pc
Turn on your computer and watch for normal startup sounds and lights. The screen should display the boot logo without flickering or glitches. If the PC fails to boot or shows errors, the GPU may not be seated correctly. Try reseating again if problems persist.
Checking For Improved Performance
Run your usual programs or games to see if performance improves. Look for smoother graphics and faster load times. Lagging or crashing could mean the GPU is still loose or faulty. Testing different apps helps confirm stable GPU function.
Monitoring Temperatures And Stability
Use software tools to track GPU temperature during use. Temperatures should stay within safe limits and not spike suddenly. Watch for any crashes or freezes that indicate instability. Stable temperatures and smooth operation show successful reseating.
Additional Tips To Maintain Gpu Health
Maintaining your GPU’s health is important for its long life and good performance. Simple care steps keep your graphics card working well. These tips help avoid problems and keep your PC running cool and fast.
Regular Cleaning Schedule
Dust and dirt can block your GPU’s fans and vents. Cleaning it often stops overheating. Use a soft brush or compressed air to remove dust. Clean inside your PC every few months. This keeps air flowing and parts cool.
Ensuring Proper Airflow
Good airflow lowers temperature inside your PC case. Make sure cables do not block air paths. Use extra fans if your case feels hot. Keep the PC in a cool place, away from heat sources. Cooler air means your GPU runs better and lasts longer.
Updating Graphics Drivers
Graphics drivers control how your GPU works with software. Update drivers regularly for better speed and fewer bugs. Visit the GPU maker’s official website to download drivers. New drivers improve games, fix errors, and add features. Always use the right driver for your GPU model.

Credit: www.youtube.com
Frequently Asked Questions
How Do I Safely Remove A Gpu From My Pc?
First, power off your PC and unplug it. Open the case and locate the GPU. Release the PCIe slot latch and gently pull the GPU out. Handle the GPU by its edges to avoid damage.
When Should I Reseat My Gpu?
Reseat your GPU if you experience display issues, crashes, or poor performance. It also helps if the GPU was recently installed or moved.
What Tools Are Needed To Reseat A Gpu?
Generally, only a screwdriver is needed to open the PC case. Some cases might require specific tools, but usually, no special tools are needed to remove the GPU.
Can Reseating The Gpu Fix Display Problems?
Yes, reseating the GPU can resolve loose connection issues causing flickering, black screens, or artifacts on display.
Conclusion
Reseating your GPU can fix many common computer problems. Take your time to do each step carefully. Make sure the power is off before you start. Gently remove and then firmly reinsert the GPU into its slot. This simple task can improve your PC’s performance and stability.
Regular checks help keep your computer running smoothly. Now, you know how to reseat your GPU safely and easily. Stay patient, and your efforts will pay off.