
Are you ready to boost your computer’s performance by installing a new CPU? It might sound tricky, but with the right steps, you can do it yourself and save time and money.
Imagine your computer running faster, handling games, work, or creative tasks with ease. This guide will walk you through every step clearly and simply, so you won’t feel lost or overwhelmed. Keep reading, and by the end, you’ll have the confidence to upgrade your CPU like a pro.
Credit: www.youtube.com
Preparing Your Workspace
Preparing your workspace is the first step to a smooth CPU installation. A clean and organized area helps avoid mistakes. It also protects your new CPU from damage. Taking time to prepare makes the whole process easier and safer.
Gathering Necessary Tools
Collect all the tools before you start. A screwdriver, thermal paste, and cleaning materials are essential. Having everything ready saves time. It also prevents interruptions during installation. Check your CPU package for any special tools needed.
Ensuring Static Safety
Static electricity can harm computer parts. Use an anti-static wrist strap to stay safe. If you don’t have one, touch a metal object to discharge static. Work on a non-carpeted floor to reduce static build-up. Keep your components in anti-static bags until use.
Clearing And Organizing The Area
Clear your desk or table of clutter. A tidy space helps find parts quickly. Lay a soft cloth or mat to protect your computer parts. Keep small screws and parts in a container. This avoids losing important pieces during installation.
Credit: www.easeus.com
Removing The Old Cpu
Start by turning off the computer and unplugging it. Open the case, then carefully lift the old CPU from its socket. Handle the chip gently to avoid damage.
Powering Down And Unplugging
Start by shutting down your computer completely. Do not just restart or sleep. After shutdown, unplug the power cable from the wall socket or power strip. Remove all other connected devices like keyboards and mice. This prevents any power running through the system. Safety first.
Accessing The Cpu Socket
Open your computer case carefully. Most cases have screws or clips at the back. Remove the side panel to see inside. Locate the motherboard inside the case. The CPU socket is usually near the center. It often has a large heat sink or fan on top. Remove the heat sink by loosening the screws or clips. This reveals the CPU socket beneath.
Releasing The Cpu Lock
Look for the CPU retention arm or lever next to the socket. Gently lift or push the arm to unlock the CPU. Do this slowly to avoid damaging the motherboard. Once unlocked, the CPU will be free to lift out. Carefully lift the old CPU straight up. Do not wiggle or force it. Place the old CPU safely aside.
Installing The New Cpu
Installing the new CPU is a key step in upgrading your computer. It requires careful handling and attention to detail. This section guides you through the main steps to place your CPU correctly and safely into the motherboard.
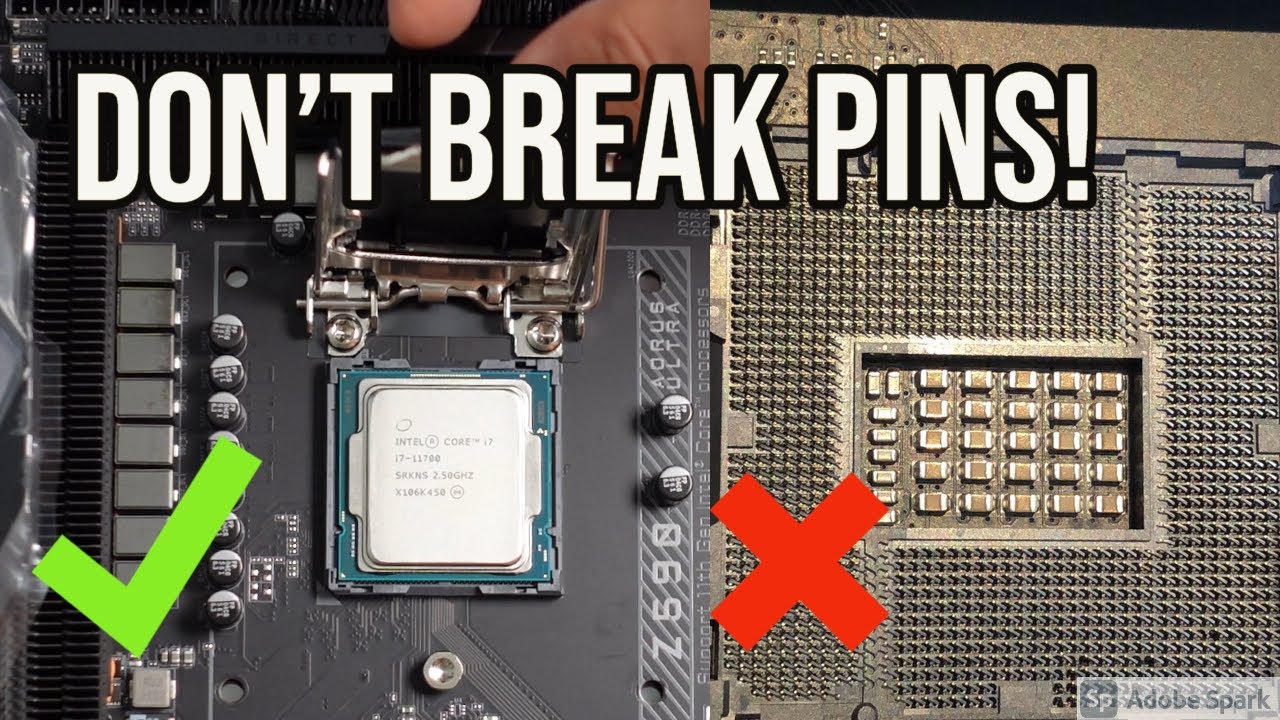
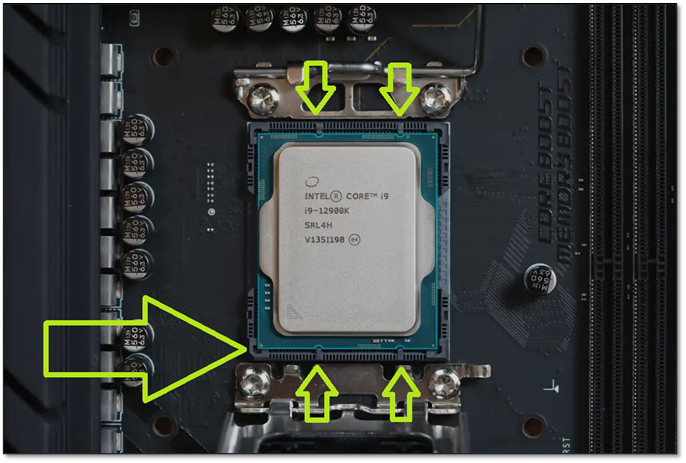
Aligning The Cpu Correctly
Look closely at the CPU and the socket on the motherboard. Find the small triangle or notch on one corner of the CPU. Match this mark with the same sign on the socket. This ensures the pins line up properly. Never force the CPU into the socket. Proper alignment prevents damage to the pins or the chip.
Placing The Cpu Into Socket
Hold the CPU gently by the edges. Avoid touching the pins or the surface. Slowly lower the CPU straight down into the socket. It should fit snugly without pressure. If it does not drop in easily, check the alignment again. A well-placed CPU sits flat and flush with the socket base.
Securing The Cpu Lock
Once the CPU is in place, secure it with the locking mechanism. This might be a lever or a latch beside the socket. Lower the lever gently until it clicks or locks firmly. This keeps the CPU stable during use. Double-check the lock is fully engaged before moving on.
Applying Thermal Paste
Applying thermal paste is a crucial step when installing a new CPU. It helps transfer heat from the CPU to the cooler. Without proper thermal paste, the CPU can overheat and slow down or get damaged. This section explains how to choose and apply thermal paste correctly.
Choosing The Right Thermal Paste
Pick thermal paste that matches your CPU and cooler. Some pastes offer better heat transfer. Others last longer or are easier to apply. Common types include silicone-based, metal-based, and ceramic-based pastes. Metal-based pastes often perform best but can be conductive. Ceramic-based pastes are safer and good for beginners.
Applying The Correct Amount
Use a small amount of thermal paste. A pea-sized drop in the center of the CPU is enough. Too much paste can block heat transfer. Too little paste leaves gaps, causing poor cooling. Spread paste naturally when you install the cooler. The pressure will spread it evenly over the surface.
Avoiding Common Mistakes
Do not reuse old thermal paste. Always clean the CPU and cooler surface first. Use isopropyl alcohol and a lint-free cloth. Avoid touching the CPU surface or cooler base. Oils from your fingers reduce thermal paste effectiveness. Never apply thermal paste on the CPU socket or motherboard.
Reattaching The Cpu Cooler
Reattaching the CPU cooler is a key step after installing your new CPU. It keeps the processor cool and prevents overheating. Proper installation ensures your PC runs smoothly and avoids damage. Follow these steps carefully to secure the cooler correctly.
Mounting The Cooler Properly
Place the cooler gently on top of the CPU. Align it with the mounting holes around the socket. Avoid sliding the cooler on the CPU surface. Press the cooler down evenly. Tighten screws or clips in a diagonal pattern. This ensures even pressure on the CPU.
Connecting The Cooler Fan
Locate the CPU fan header on the motherboard. It is usually near the CPU socket. Plug the cooler fan cable into this header. Make sure the connection is firm. A loose connection can stop the fan from working. Proper fan connection helps keep the CPU temperature low.
Verifying Cooler Stability
Check if the cooler is firmly attached. Try to gently move the cooler. It should not wiggle or shift. Loose coolers can cause poor contact and overheating. Confirm the fan spins freely without noise. A stable cooler means better cooling performance.

Credit: www.sietesetenta.com.ar
Final Checks And Testing
After installing your new CPU, it is important to perform final checks and testing. This step ensures the CPU works correctly and your computer runs smoothly. Take your time to carefully complete these tasks.
Reassembling The Computer Case
Start by putting the computer case back together. Make sure all cables connect properly and no parts are loose. Secure the side panels with screws. Check that fans and other components are in place.
Booting Up The System
Turn on your computer for the first time after installation. Watch the screen closely for any error messages. The system should reach the desktop or BIOS screen without problems. If it does not start, recheck your CPU installation.
Monitoring Cpu Temperature
Check the CPU temperature using software tools. Temperatures should stay within safe limits, usually below 80°C. High temperatures may mean the cooler is not installed properly. Keep an eye on the temperature during the first few hours of use.
Troubleshooting Installation Issues
Installing a new CPU can sometimes lead to issues that stop the computer from working properly. Troubleshooting these problems helps fix the installation and get your system running smoothly. This section explains common problems and easy solutions to handle them.
Handling Boot Failures
Boot failures happen when the computer does not start after CPU installation. Check if the CPU is seated correctly in the socket. Make sure the locking mechanism is secure. Inspect the power connections to the CPU fan and motherboard. Reset the BIOS by removing and reinserting the CMOS battery. Try booting with minimal hardware to find conflicts.
Addressing Overheating
Overheating can damage the CPU and cause shutdowns. Apply the right amount of thermal paste between the CPU and cooler. Ensure the cooler is firmly attached. Clean dust from fans and heatsinks for better airflow. Monitor CPU temperature using software tools. Replace the cooler if it is faulty or not powerful enough.
Resolving Compatibility Problems
Compatibility issues occur if the CPU does not match the motherboard. Verify the CPU model fits the motherboard socket type. Update the motherboard BIOS to support the new CPU. Check the motherboard manual for supported processors. Use official manufacturer websites to confirm compatibility before installation.
Frequently Asked Questions
What Tools Do I Need To Install A New Cpu?
You need a screwdriver, thermal paste, and an anti-static wrist strap. These tools help safely remove the old CPU and install the new one without damage.
How Do I Remove The Old Cpu Safely?
Turn off and unplug your PC. Ground yourself to avoid static. Unlock the CPU socket lever and gently lift out the old CPU.
How Much Thermal Paste Should I Apply?
Apply a small pea-sized amount of thermal paste on the CPU’s center. This ensures proper heat transfer between the CPU and cooler.
Can I Use The Old Cpu Cooler With A New Cpu?
It depends on socket compatibility. Check if your cooler supports the new CPU socket. Otherwise, you may need to buy a new cooler.
Conclusion
Installing a new CPU can seem tricky but is quite simple. Follow each step carefully and take your time. Double-check connections before powering on your computer. This helps avoid damage and ensures the CPU works well. With patience and care, your computer will run faster and better.
Enjoy the boost in performance and learn from the process. Ready to try it yourself?