
Are you tired of your computer automatically using the wrong graphics card? Changing the default GPU in Windows 11 can boost your system’s performance and improve your gaming or work experience.
If you want to make sure your laptop or PC uses the best graphics processor for each task, this guide is exactly what you need. Keep reading, and you’ll learn simple steps to take control of your graphics settings and get the smooth, fast visuals you deserve.

Credit: pureinfotech.com
Check Current Gpu Settings
Before changing the default GPU in Windows 11, check the current GPU settings. This step helps you understand which graphics card your system uses now. Knowing the default GPU ensures you select the right one for your needs.
Access Display Settings
First, right-click on the desktop. Select Display settings from the menu. This opens the display configuration page. Scroll down to find the Graphics option. Click it to open GPU-related settings.
Identify Default Gpu
Inside the Graphics settings, you see a list of apps and their GPU preferences. To find the default GPU, check which GPU is set to high performance. This GPU is usually the one used for demanding tasks. You can also look at the Advanced display settings to see the active GPU for each monitor.
Set Default Gpu Via Graphics Settings
Changing the default GPU in Windows 11 is simple with Graphics Settings. This lets you pick which graphics card runs your apps and games. Setting the right GPU can improve performance and save battery life.
Windows 11 allows easy control over GPU preferences for each app. You can assign high-performance or power-saving GPUs based on your needs. Follow the steps below to set your default GPU through Graphics Settings.
Open Graphics Preferences
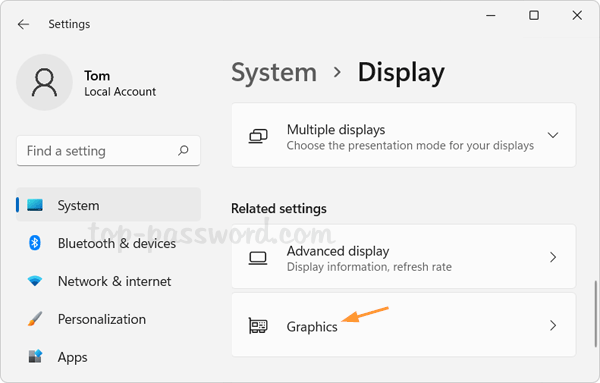
First, open the Settings app by pressing Windows + I keys. Next, go to System and then click on Display.
Scroll down and click on Graphics. This opens the Graphics Settings page. Here, you manage GPU preferences for your apps.
Choose Specific Gpu For Apps
On the Graphics Settings page, select the app type: Desktop app or Microsoft Store app. Click Browse to find the app’s .exe file if needed.
Select the app from the list, then click Options. Choose the preferred GPU: Let Windows decide, Power saving (usually integrated GPU), or High performance (usually dedicated GPU).
Click Save to apply the settings. The selected GPU will now run the app by default. Repeat for other apps as needed.
Change Gpu In Device Manager
Changing the default GPU in Windows 11 can improve your computer’s performance. Using Device Manager lets you manage your graphics cards easily. This tool shows all hardware connected to your PC. You can check your GPUs and change settings here.
Locate Display Adapters
Open Device Manager from the Start menu. Look for the category called “Display adapters.” Click the arrow next to it. This expands a list of all GPUs on your system. You will see the default and any other installed graphics cards.
Update Or Disable Gpu
Right-click on the GPU you want to change. Select “Update driver” to check for new software. This can fix problems and improve performance. To switch GPUs, you can also choose “Disable device” on the current default GPU. Then enable your preferred GPU by right-clicking it and selecting “Enable device.”
Credit: www.top-password.com
Adjust Gpu In Bios
Adjusting your GPU settings in the BIOS can help set the default graphics processor. This method works well for users with both integrated and dedicated GPUs. It ensures the system uses the preferred GPU from the start. Changing these settings requires careful steps to avoid system issues.
Enter Bios Setup
Restart your computer. Before Windows loads, press the BIOS key. Common keys include F2, Del, or Esc. The key varies by manufacturer. Watch the screen for a prompt during startup. Use the arrow keys to navigate inside BIOS menus.
Modify Gpu Priority
Find the settings related to graphics or video configuration. Look for options like “Primary Display” or “GPU Priority.” Choose your preferred GPU, such as PCIe for dedicated cards. Save changes before exiting BIOS. Your system will now prioritize the selected GPU at startup.
Use Manufacturer Software
Changing the default GPU in Windows 11 is easier with software made by your GPU’s manufacturer. These programs offer simple tools to choose which graphics card your system uses. They give more control than Windows settings alone.
Using the manufacturer software ensures the right GPU runs your apps. It helps improve performance and saves battery life on laptops. Below are steps for two main GPU brands.
Nvidia Control Panel
Open the NVIDIA Control Panel from your desktop or start menu. Click on “Manage 3D settings” in the left menu. Select the “Program Settings” tab. Here, choose the app you want to set the GPU for. Pick the preferred graphics processor from the dropdown menu. Click “Apply” to save changes. Your chosen app will now use the selected GPU.
Amd Radeon Settings
Launch AMD Radeon Settings by right-clicking the desktop. Select “System” and then “Switchable Graphics.” Find the app you want in the list or add it manually. Choose “High Performance” to use the dedicated GPU. Choose “Power Saving” to use the integrated GPU instead. Close the settings to apply changes. Your system will use the selected GPU for that app.
Optimize Gpu Performance
Optimizing GPU performance helps your computer run faster and smoother. It lets your graphics card work better with Windows 11. This can improve gaming, video editing, and other tasks that need strong graphics power.
Small changes can make a big difference in how well your GPU performs. Follow these steps to keep your GPU updated and efficient.
Update Gpu Drivers
GPU drivers are software that help your computer talk to the graphics card. Old drivers can cause slow performance or errors. Check for the latest drivers from your GPU maker’s website. Install updates regularly to keep your GPU working at its best. Windows 11 also offers automatic updates through Device Manager. Updated drivers fix bugs and improve speed.
Manage Power Settings
Power settings affect how your GPU uses energy. Balanced or power saver modes can limit GPU speed to save battery. Change power settings to High Performance for better GPU output. Open Settings, go to System > Power & Battery, then select High Performance. This setting gives your GPU more power to handle tasks without slowing down.
Troubleshoot Common Issues
Changing the default GPU in Windows 11 can sometimes cause problems. These issues can affect your computer’s speed and graphics. Troubleshooting these problems helps keep your system running smoothly. This section covers common issues and their fixes.
Fix Gpu Switching Problems
Sometimes Windows 11 does not switch to the preferred GPU automatically. Check your graphics settings first. Open Settings, then go to System > Display > Graphics. Ensure your preferred GPU is set for the app.
Update your graphics drivers. Outdated drivers often cause switching errors. Visit the GPU maker’s website and download the latest drivers. Restart your PC after installation.
Disable integrated graphics in Device Manager if switching fails. This forces Windows to use the dedicated GPU only. Right-click Start, select Device Manager, find Display adapters, then disable the integrated GPU.
Resolve Performance Drops
Performance can drop after changing the default GPU. First, check power settings. Use High Performance mode in Control Panel under Power Options. This lets your GPU run at full speed.
Close background apps that use GPU power. Too many running apps can slow down your system. Use Task Manager to end unnecessary programs.
Monitor your GPU temperature. High heat can reduce performance. Clean your PC’s fans and vents to keep it cool. Use software tools to check GPU temperature regularly.

Credit: pureinfotech.com
Frequently Asked Questions
How Do I Set Default Gpu In Windows 11?
Open Settings, go to System > Display > Graphics settings. Choose the app, then select the preferred GPU under Options. Save changes to set the default GPU for that application.
Can I Switch Default Gpu For Specific Apps?
Yes, Windows 11 allows setting default GPUs per app. Use Graphics settings to assign a preferred GPU for each program individually.
Why Change Default Gpu On Windows 11?
Changing the default GPU improves performance and battery life by optimizing graphics processing based on app needs and hardware capabilities.
Does Windows 11 Support Integrated And Dedicated Gpu Switching?
Yes, Windows 11 supports seamless switching between integrated and dedicated GPUs. It manages GPU usage automatically or manually via settings.
Conclusion
Changing the default GPU in Windows 11 is simple and quick. You can improve your computer’s performance with just a few clicks. This helps you run apps and games smoother. Remember to pick the right GPU for your needs. Keep your drivers updated for the best results.
Now, your system uses the GPU you want. Enjoy better graphics and faster speed every time. This small change can make a big difference. Try it today and see the improvements yourself.