
Are you ready to build or upgrade your PC but feel unsure about connecting the power supply to your CPU? You’re not alone.
This step is crucial because a secure connection ensures your computer runs smoothly and avoids damage. You’ll learn exactly how to connect the power supply to your CPU quickly and safely. By the end, you’ll have the confidence to handle this task like a pro, saving time and preventing costly mistakes.
Keep reading, and let’s get your system powered up the right way!
Preparing Your Workspace
Preparing your workspace is the first step to connect the power supply to the CPU safely. A clean and organized area helps avoid mistakes and makes the process faster. Take time to set up everything before starting the connection.
Clear space reduces the risk of losing small parts. It also helps to keep tools and components within reach. A well-prepared workspace improves focus and safety.
Gathering Necessary Tools
Collect all tools needed for the job. A screwdriver is essential for opening the case and securing cables. Have a flashlight handy to see small parts clearly. Keep a pair of tweezers nearby for handling tiny connectors. Prepare all cables from the power supply before starting.
Ensuring Safety Precautions
Turn off the computer and unplug it from the power outlet. Avoid working on a carpet to reduce static electricity risk. Use an anti-static wrist strap if available. Touch a metal part of the case to discharge static before handling components. Keep liquids away from the workspace to prevent spills.
Organizing Components
Place all parts in a neat order. Separate screws, cables, and connectors in small containers or trays. Label cables if needed to avoid confusion during installation. Keep the power supply near the case for easy access. Organizing parts helps maintain a smooth workflow.
Identifying Power Supply Connectors
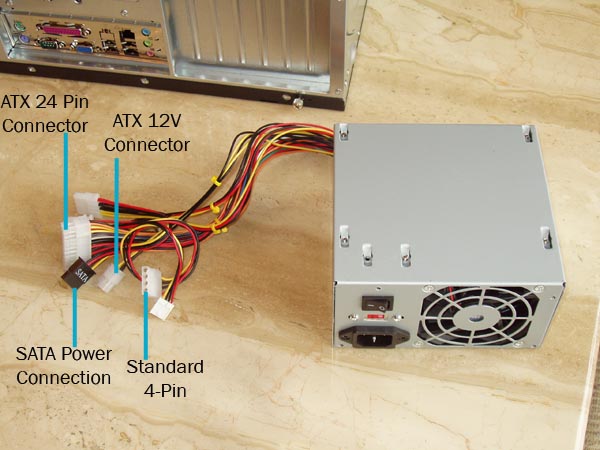
Identifying power supply connectors is the first step to connect your CPU correctly. Power supplies come with several cables and plugs. Each connector has a specific role. Knowing these connectors helps avoid mistakes and damage.
Main Power Connector
The main power connector is the largest plug from the power supply. It usually has 20 or 24 pins. This connector powers the motherboard. You must plug it into the motherboard’s main power slot. It supplies power to many components.
Cpu Power Connector
The CPU power connector is smaller than the main power plug. It often has 4, 6, or 8 pins. This connector provides power directly to the CPU. Look for a nearby socket on the motherboard, often labeled “CPU_PWR.”
Additional Connectors
Some power supplies include extra connectors. These may power extra components like graphics cards or fans. Examples are PCIe connectors or SATA power plugs. Use them only if your system needs those parts.
Locating Cpu Power Socket On Motherboard
Finding the CPU power socket on your motherboard is the first step to connect the power supply. This socket delivers the necessary power directly to the CPU. It looks different from other power connectors on the board. Knowing its location helps avoid mistakes during installation.
The CPU power socket usually sits near the top edge of the motherboard. It is close to the CPU socket itself. This position makes it easy to connect the power cable without stretching or bending it too much.
Identifying The Cpu Power Socket
The CPU power socket often has 4 or 8 pins. It may be labeled as “CPU_PWR” or “ATX_12V” on the motherboard. The shape is rectangular and smaller than the main power socket. Check your motherboard manual to confirm the exact spot.
Common Locations On Different Motherboards
Most motherboards place the CPU power socket in the top-left corner. Some models might have it near the top-center. The socket should always be close to the CPU chip. This layout helps deliver power efficiently.
Visual Tips To Spot The Socket Easily
Look for a connector with a clip on one side. The clip locks the power cable in place. The pins inside the socket are arranged in two rows. The socket color often matches the motherboard’s power connectors.
Credit: fundacioninbursa.org
Connecting The Power Supply To Cpu
Connecting the power supply to the CPU is a key step in building or upgrading a computer. This connection provides the CPU with the electricity it needs to work. A proper connection ensures your system runs smoothly and avoids damage.
Aligning The Connector Properly
Start by finding the CPU power connector from the power supply. It usually has 4 or 8 pins. Check the shape of the connector and the CPU socket. They only fit one way. Hold the connector gently and line it up with the socket. Avoid forcing it in.
Securing The Connection
Once aligned, push the connector straight into the socket. You may hear a soft click. This sound means the connector has locked in place. Do not wiggle or force it after it clicks. Secure connections prevent power loss and short circuits.
Checking For Firm Attachment
After connecting, lightly pull the connector to check it is tight. It should not move or come out easily. A loose connection can cause computer crashes or failure to power on. Double-checking ensures the CPU gets stable power.
Verifying Connections And Testing
Verifying connections and testing are key steps after connecting the power supply to the CPU. These steps ensure the system receives power correctly. They help avoid damage and save time. Careful checks improve system stability and performance.
Always confirm each cable is connected properly before powering on. Testing the system early finds issues fast. This section guides you through these important steps.
Double-checking Cable Routes
Trace each cable from the power supply to the CPU socket. Ensure cables follow clean, clear paths. Avoid tight bends or sharp angles. Check that connectors fit snugly into the motherboard. Loose connections cause power failure or damage. Organize cables to improve airflow inside the case. Use cable ties to keep cables neat and secure.
Powering On The System
Press the power button gently after confirming connections. Observe the system for any signs of power. Look for motherboard lights or fan movement. Listen for beeps or startup sounds. These signs show the CPU receives power. If nothing happens, do not force it. Switch off and recheck all connections carefully.
Troubleshooting Common Issues
Check for loose or swapped cables if the system won’t start. Inspect the CPU power connector for bent pins. Verify the power supply switch is on. Test the power supply with a different system if possible. Clear dust from connectors and slots. Replace any damaged cables or connectors. Use the motherboard manual to confirm power pin layout. These steps solve most connection problems quickly.

Credit: www.corsair.com
Tips For Cable Management
Good cable management keeps your computer neat and safe. It helps prevent cables from tangling or getting damaged. Proper organization also improves airflow inside the case. This reduces heat and keeps your CPU cooler. Follow these simple tips to manage cables when connecting your power supply to the CPU.
Using Cable Ties
Cable ties keep wires bundled and tidy. Use small ties to group cables running in the same direction. Avoid tying too tight to prevent damage. Velcro straps work well for easy adjustments. Neat bundles reduce clutter and make future upgrades easier.
Avoiding Obstructions
Place cables away from moving parts like fans. Avoid blocking access to key components. Keep cables flat against the case walls or behind the motherboard tray. This prevents cables from interfering with hardware or airflow paths.
Maintaining Airflow
Clear airflow paths help your CPU stay cool. Route cables to avoid blocking fans and vents. Use the case’s cable management holes to guide wires. Organized cables allow air to flow freely and improve system stability.

Credit: softwareg.com.au
Frequently Asked Questions
How Do I Connect Power Supply To Cpu Safely?
Always turn off the power before connecting. Locate the 24-pin motherboard connector and the 4/8-pin CPU power cable. Firmly plug the CPU power cable into the motherboard socket until it clicks. Avoid forcing connectors to prevent damage.
What Cable Powers The Cpu From Psu?
The CPU is powered by the 4-pin or 8-pin EPS power cable from the PSU. This cable connects directly to the motherboard’s CPU power socket, supplying stable power for optimal processor performance.
Can I Use Any Power Supply For Cpu Connection?
Not all power supplies are compatible. Ensure the PSU has the correct CPU power connectors and sufficient wattage to support your CPU and system requirements.
Where Is The Cpu Power Connector Located On The Motherboard?
The CPU power connector is near the CPU socket, usually at the top-left corner of the motherboard. It is labeled as CPU_PWR or EPS_PWR and fits the 4/8-pin CPU power cable.
Conclusion
Connecting the power supply to the CPU is simple with the right steps. Always check the cable fits securely into the CPU power port. Avoid forcing connectors to prevent damage. Make sure the power supply is off before starting. A steady connection helps your computer run smoothly and safely.
Take your time and double-check each connection. This small effort keeps your PC stable and reliable. Ready to power up? You’ve got this.