
Are you looking to upgrade your computer or fix a hardware issue? Knowing how to remove RAM from your CPU can save you time and money.
It might sound tricky, but with the right steps, you can do it safely and easily. In this guide, you’ll discover simple tips to remove your RAM without damaging your computer. Keep reading, and you’ll feel confident handling your PC like a pro.
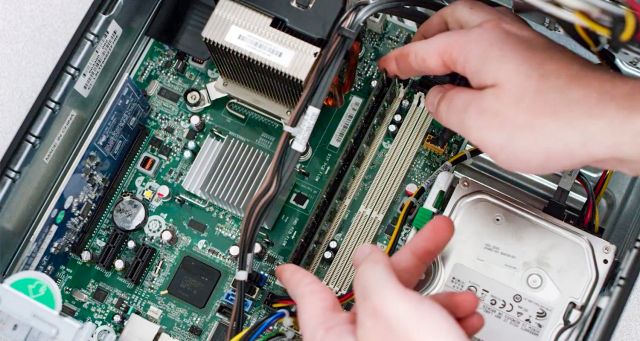
Credit: www.crucial.com
Tools Needed
Removing RAM from a CPU needs a few basic tools. These tools help keep the process safe and smooth. Having the right tools makes the job easier and protects your computer parts.
Anti-static Wrist Strap
This strap stops static electricity from damaging computer parts. Wear it on your wrist and connect it to a metal part of the case. This tool is cheap but very important.
Screwdriver
A small Phillips screwdriver helps open the computer case. Some cases need screws removed to access the RAM slots. Keep the screws safe after removal.
Plastic Pry Tool
A plastic pry tool helps open clips without scratching parts. It is gentle and prevents damage to the motherboard or RAM. Use it carefully to lift RAM clips.
Clean Cloth
A soft cloth cleans dust from the RAM and slots. Dust can cause poor connections or damage. Wipe gently to keep components clean and safe.
Prepare Your Workspace
Clear your desk and find a clean, flat surface to work on. Gather tools like a screwdriver and an anti-static wristband to protect your parts. Make sure the computer is turned off and unplugged before starting.
Clear Your Desk
Start by clearing your desk or workspace. Remove any unnecessary items. This creates space to work comfortably. A clutter-free area reduces the chance of losing small parts. It also helps you focus on the task.
Gather Necessary Tools
Collect all tools before you begin. Usually, a screwdriver is enough. Some CPUs need an anti-static wrist strap. This tool prevents static electricity from damaging parts. Having tools ready saves time and avoids interruptions.
Power Down And Unplug
Turn off your computer completely. Unplug the power cable from the socket. Disconnect other peripherals like the mouse and keyboard. This step ensures safety and prevents electric shocks. It also protects your computer parts.
Work On A Non-conductive Surface
Choose a non-conductive surface like a wooden table. Avoid working on carpets or metal surfaces. Non-conductive surfaces prevent static electricity buildup. This reduces the risk of damaging your RAM or motherboard.
Ground Yourself Properly
Touch a metal object to release static electricity. Alternatively, use an anti-static wrist strap. Grounding protects your computer parts from static shocks. It’s a simple step that prevents costly damage.
Power Down The Computer
Powering down the computer is the first important step before removing RAM. It keeps you safe and protects your hardware. Always turn off the system fully to avoid damage.
Do not just put the computer on sleep mode or hibernate. These modes still allow electricity to flow. This can cause harm to the RAM or other parts.
Shut Down Using The Operating System
Click the Start menu or power icon on your screen. Select “Shut down” or “Power off.” Wait until the screen goes completely black.
Unplug The Power Cable
After the system is off, remove the power cable from the outlet. This stops all power going to the computer. It makes the system safe to open.
Disconnect External Devices
Remove all USB drives, keyboards, mice, and other cables. This prevents any accidental damage or short circuits. It also makes moving the computer easier.
Credit: www.avadirect.com
Open The Computer Case
Opening the computer case is the first step to remove RAM from your CPU. It lets you access the internal parts safely. You need to be careful and gentle during this process.
Before opening the case, turn off your computer. Unplug all cables and power cords. This prevents any electrical damage or shocks.
Find a clean, flat surface to work on. Avoid carpets or static-prone areas. Static can damage computer parts.
Use an anti-static wrist strap if possible. It keeps electricity from harming your components.
Locate The Case Screws
Look at the back of your computer case. You will see screws holding the side panel in place. Most cases have two or more screws.
Use a screwdriver to remove these screws carefully. Keep them safe for later use.
Remove The Side Panel
After unscrewing, gently slide or lift the side panel off. Some panels may need a slight push or pull. Don’t force it.
Set the panel aside on a soft surface to avoid scratches.
Inspect The Inside Of The Case
Take a moment to look inside. You will see the motherboard and RAM slots. Check for any dust or loose cables.
Clean dust with a soft brush or compressed air if needed. This helps keep your computer cool and running well.
Locate The Ram Modules
Locating the RAM modules is the first step in removing RAM from a CPU. These modules are small circuit boards that store data temporarily. They help your computer run multiple tasks smoothly. Finding them inside the computer case is easy with some guidance.
RAM modules sit in special slots on the motherboard. These slots hold the RAM firmly in place. They are usually long and narrow, with clips on both ends. Knowing where these slots are helps prevent damage during removal.
Turn off your computer and unplug all cables. Place the computer on a flat surface. Use a screwdriver to remove the side panel. This panel covers the internal parts. Carefully take it off to see inside.
Identify The Motherboard
The motherboard is the large board inside the case. It connects all parts of your computer. Look for a green or brown board with many small chips. This is where the RAM slots are located.
Spot The Ram Slots
RAM slots are near the CPU socket on the motherboard. They are thin and long with clips on each side. Usually, they are placed side by side. The RAM modules fit tightly into these slots.
Check The Ram Modules
RAM modules are rectangular and have small black chips. They stand upright in the slots. Each module has a small notch at the bottom. This notch helps place the RAM the right way.
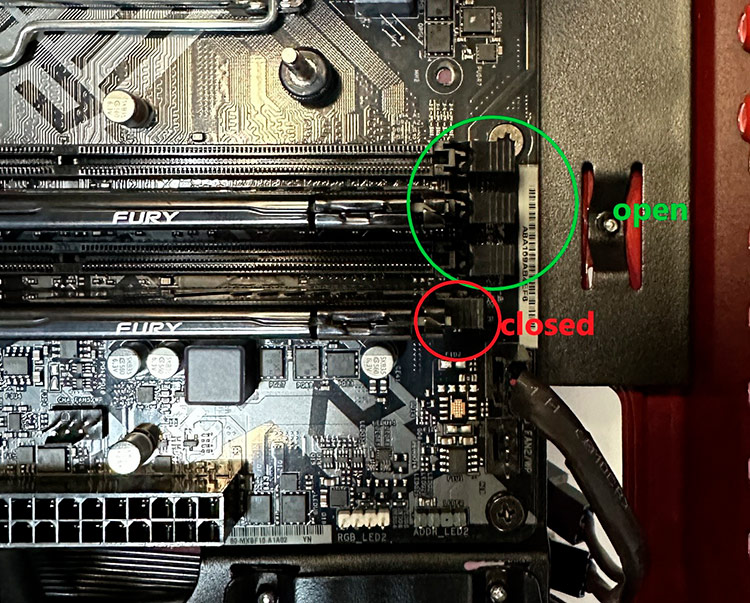
Release The Ram Locks
Releasing the RAM locks is the first step to safely remove the RAM from your CPU. These small clips hold the RAM stick in place. They keep the memory secure during computer use. Understanding how to release these locks helps avoid damage to the RAM or motherboard.
These locks are usually on both ends of the RAM slot. They snap into place to hold the RAM firmly. Gently pushing them outward releases the RAM stick. This action frees the memory so you can lift it out easily.
Locate The Ram Locks
Open your computer case carefully. Find the RAM slots on the motherboard. Look for small plastic clips on each side of the RAM stick. These are the locks you need to release.
Gently Press The Locks Outward
Use your fingers to press the locks away from the RAM stick. Do this slowly and with light pressure. The locks will pop outward and release the RAM.
Check That Both Locks Are Released
Ensure that both clips on each side of the RAM stick move outward. Only then will the RAM be free to remove without force.
Remove The Ram Modules
Removing RAM modules from a CPU is a simple task with the right steps. It helps when upgrading or fixing your computer.
Understanding how to safely take out RAM prevents damage to your parts. Follow these clear steps for success.
Power Off And Unplug Your Computer
Turn off your computer fully. Unplug the power cable from the socket. This stops any electric flow to your device.
Find the screws or latches on your case. Remove them carefully. Slide or lift the panel to open the case.
Look for long, thin sticks on the motherboard. These are the RAM modules, usually held by clips on both ends.
Release The Ram Clips
Push down or out on the clips at each side of the RAM. The module will pop up slightly once released.
Remove The Ram Module
Hold the module by its edges. Pull it out gently and straight from the slot. Avoid touching the gold connectors.
Handle Ram Safely
Handling RAM safely is very important before removing it from your CPU. RAM is delicate and can be damaged by static electricity or rough handling. Taking simple precautions keeps your RAM working well and avoids extra costs.
Careful handling also protects other computer parts. Your RAM sticks need gentle treatment to stay functional. Follow these tips to avoid damage and keep your computer safe.
Wear An Anti-static Wrist Strap
Static electricity can harm your RAM. An anti-static wrist strap stops this problem. Connect the strap to a grounded metal part before touching the RAM. This lets static electricity leave your body safely.
Hold Ram By Its Edges
Touch only the edges of the RAM stick. Avoid touching the gold connectors or chips. Oils and dirt from fingers can cause poor connections or damage. Holding the edges keeps the RAM clean and safe.
Work On A Non-conductive Surface
Place your computer and RAM on a non-conductive surface. Wood or plastic tables are good choices. Avoid carpets or metal surfaces. This reduces the chance of static electricity build-up.
Keep Ram In An Anti-static Bag
Store RAM in an anti-static bag when not using it. These bags protect against static damage. Avoid regular plastic bags. Anti-static bags are inexpensive and easy to find.
Remove Ram Gently
Push the clips on both sides of the RAM slot outward carefully. Do not use force. Gently pull the RAM stick straight out. Rough removal can break the RAM or the motherboard slot.
Close The Computer Case
Closing the computer case is a simple but important step after removing or installing RAM. It protects the internal parts from dust and damage. A properly closed case keeps your computer safe and helps it run smoothly.
Make sure all internal components are secure before closing the case. This prevents loose parts from moving inside. Take your time to avoid any damage or misalignment.
Align The Case Panels
Place the side panel back in line with the computer frame. Check that all edges match up neatly. Avoid forcing the panel as it may bend or break.
Secure The Screws
Use a screwdriver to tighten all screws on the case. Screws keep the panel firmly in place. Tighten them evenly to avoid gaps or loose parts.
Check For Proper Closure
After tightening, press gently on the case edges. Confirm there are no open gaps or loose spots. A sealed case means better protection for the computer.
Power On And Test
Powering on the computer after removing RAM is crucial. It confirms if the RAM removal process went well. Testing helps find any issues early before using the PC normally.
Turn on the PC carefully. Watch for any unusual sounds or error messages. The system should start without problems. If it does, the RAM is removed correctly.
Check For Beep Codes
Listen to the computer’s beep sounds right after powering on. Beep codes tell if the system detects hardware problems. No beeps or one short beep usually means no issues.
Look At The Display
See if the monitor shows the startup screen. A clear display means the PC works without the removed RAM. Blank or error screens suggest a problem.
Use System Bios
Enter BIOS setup by pressing the key shown during boot. Check the memory section to confirm RAM status. BIOS shows how much RAM is installed and working.

Credit: www.youtube.com
Frequently Asked Questions
How Do I Safely Remove Ram From A Cpu?
First, power off and unplug your PC. Open the case and locate the RAM slots. Release the side clips gently. Carefully pull the RAM module straight out without bending.
What Tools Are Needed To Remove Ram From A Cpu?
No special tools are needed. Just a screwdriver to open the case. Handle RAM carefully using anti-static precautions to avoid damage.
Can I Remove Ram While The Cpu Is Running?
No, always shut down and unplug the computer. Removing RAM while powered can damage both the hardware and data.
How Do I Avoid Damaging Ram During Removal?
Handle RAM by its edges only. Avoid touching the gold connectors. Use an anti-static wrist strap or discharge static by touching metal before handling.
Conclusion
Removing RAM from a CPU is simple with the right steps. Always turn off your computer first. Gently press the clips and pull the RAM straight out. Avoid touching metal parts to stay safe. Take your time and stay careful.
This way, you protect your computer and yourself. Now, you can easily remove RAM without stress. Practice these tips to feel confident next time. Easy, safe, and quick—just how it should be.